Monks Ferry: a layout for the Grandchildren.

jonte

Western Thunderer
I’m enjoying reading about your processing as you go along Jonte. Hope it all works out….

That Grange Lane is intriguing…I only found out it what the remains were a few weeks ago….driven past them so often.

Stay warm
John

Most kind, John, thanks. I’m trying ……

I think I’m right in saying (Birkenhead) Grange Lane was prior to the service road of the old Queensway tunnel.

A link for you, John. Apologies if you’ve already seen it: Disused Stations: Birkenhead Grange Lane Station

Cheers.

Jon
 

jonte

Western Thunderer
The plinth is now complete and ready to progress:

IMG_4167.jpegIMG_4168.jpegIMG_4169.jpeg

I also have two Triang Hornby ticket offices on order with which to construct the platform section of the building as mentioned in my previous.

Now I need to transfer my store of styrene sheet and sections to the spare bedroom where I’m in the process of converting it into a temporary workshop while I work on the main building. Meanwhile I’ll continue planning the build, and purchase extra supplies where necessary.

Hopefully I can make a start in the next week or so.

jonte
 

simond

Western Thunderer
Sorry,Simon.

You lost me there.

Best,

Jon
I was hoping some kind soul would tell this Birkenhead lad what he'd missed in terms of Grange Lane station, and I see you have!

By my triangulations, I place it where the small grey-and-white "pin in a circle" symbol is on Borough Rd East, just below the K of King's Square (which is the area in which one queues to go through the Birkenhead Mersey Tunnel) between Thomas St and Jackson St.

I see there is an urban regeneration program to convert the gas works to a garden village. I do hope they do a good clean up job!

ta
S

1767963195172.png
 
Last edited:

smgee

Western Thunderer
I was hoping some kind soul would tell this Birkenhead lad what he'd missed in terms of Grange Lane station, and I see you have!

By my triangulations, I place it where the small grey-and-white "pin in a circle" symbol is on Borough Rd East, just below the K of King's Square (which is the area in which one queues to go through the Birkenhead Mersey Tunnel) between Thomas St and Jackson St.

I see there is an urban regeneration program to convert the gas works to a garden village. I do hope they do a good clean up job!

ta
S

View attachment 254892

Simon, www.railmaponline has it slightly east of there (though I don't know how accurate it is):

Screenshot 2026-01-09 at 13.39.55.jpg
 
Last edited:

smgee

Western Thunderer
Thanks Steve, I suspect it was long gone before I was showing any interest!
You and me both! I live 30 minutes to the north, pass through regularly, and had no idea it existed!

Streetview confirms the location, as I believe this is what remains of the frontage on Borough Rd E, looking towards the beautiful Queensway tunnel entrance:

(sorry Jonte, didn't mean to hijack!)

Screenshot 2026-01-09 at 13.49.36.jpg
 

jonte

Western Thunderer
You and me both! I live 30 minutes to the north, pass through regularly, and had no idea it existed!

Streetview confirms the location, as I believe this is what remains of the frontage on Borough Rd E, looking towards the beautiful Queensway tunnel entrance:

(sorry Jonte, didn't mean to hijack!)

View attachment 254898

No problem, Steve. I don’t mind the thread going off at a tangent; I’m probably the worst offender!

It’s all interesting stuff anyway.

And if I may just add, guys, the original tunnel leading to the river from Grange Lane was …………………..Monks Ferry!

Not to be confused with, of course, the London terminus of the same name (winks).

Jon
 

jonte

Western Thunderer
Work on the roof progressed by gluing graph paper to the surface as previously with Pva diluted with water and a squirt of washing up liquid. I find that neat Pva is too thick for the purpose and leaves an undulating surface. Once dried, the areas of trapped air bubbles were cut out (the difference in height is negligible) and areas that had ‘lifted’ were given a further coat of diluted glue. Unfortunately, the diluted stuff can take a couple of applications before everything sets in place. Guide lines were then drawn on to assist with spacing of ‘slates’:

IMG_4178.jpeg

For quickness, I purchased a set of precut slates from an online supplier trading on eBay and began attaching with more diluted Pva but this time slightly more concentrated. Applied with a paint brush, this stops the glue going off too soon in the dish.

The first couple of rows:

IMG_4181.jpeg

Frankly, yet again I wasn’t happy with the appearance of the proprietary items although this was a different retailer than last time; they appeared way too thick and resembled tiles. Approximately two thirds of the way to completion, I decided to return to the retailer’s online advert, positive that the image in the ad showed the product as much slimmer in appearance. They were; then I noticed two words that I’d overlooked. This is what I was supposed to have done:

IMG_0367.jpeg

……..and this is what mine looked like:

IMG_4198.jpegIMG_4199.jpeg

I considered stripping them off, but as the intention had been to save time I decided against it, so in the words of Magnum Oppusan ‘I’d started so………….etc.’. I can live with it, and as I posed to a good friend, ‘isn’t it traditional for train sets to be slightly over scale?’ :oops:

Working in short spurts (I find this task a little testing and fiddly), I managed to finish:

IMG_4200.jpeg

Then it was on to attempting a representation of the ridge tiles. Ideas came and went, and frankly bored with the task and needing to move on, I utilised some serated rectangle sections at the ends of each sheet of slates (as there are no instructions supplied, I guess this must be their purpose?). Adding further detail was considered then dropped for the reason given, and I think they’ll do for this purpose:

IMG_4201.jpeg

And perched:

IMG_0368.jpeg

Thanks for looking and your previous likes, chaps.

jonte
 

jonte

Western Thunderer
Further work on my second attempt at the roof has continued but halted to wait for the glue to go off.

To give the reader an idea of what this entails, perhaps a refresher might help.

Although I’m loosely basing the station and it’s activities on Waterloo in the early to late sixties, the building itself is even more loosely based on that of Blackfriars:

IMG_2042.jpeg

More a caricature than a copy of the prototype, I’m still using it as reference in places to save going off at a tangent. The roof is one of those ‘places’ having learnt the hard way with its previous incarnation:

IMG_2378.jpegIMG_2377.jpeg

Yuk!

Only the base was recovered; the rest of the disproportionate disaster assigned to the bin.

So going back to my earlier point concerning the latest work to the roof, it is indeed the construction of the dormer windows of the building to which I refer. Learning from past mistakes, I’m going to make them a little smaller this time (proportionate) which should also allow me to create five as per the original rather than the mere total of three of my previous attempt.

A kit of parts was therefore cut from a 30 thou(?) sheet of styrene, using a discarded piece of styrene for forming the angle of the dormers, itself an offcut from the supports of the roof when I started this second attempt a couple of years ago. Being tight fisted, I save as much of the offcuts as possible and a quick route through a myriad of pieces and shapes stored in a tin soon paid dividends. I guess sometimes the gods are favourable.

So assembly of these parts has begun of the first set of five (there were none for the rear of the roof on the previous):

IMG_4202.jpeg

Those arched sections seen in the foreground are the rear most formers and as such will have most of their length removed. To that end, they have already been prepared with scoring using a blade such that once fully attached and constructed, the excess can be snapped off.

I’m going to leave them until tomorrow to let the delicate sections set as solidly as possible as they’ve not much meat holding them together, although some tabs from offcuts have been attached to offer some reinforcement. Then the two halves can be joined and then I can do the same for the next five. The graph paper has been coated in candle wax to prevent it sticking to the joint.

Thanks for looking.

jonte
 

Lyndhurstman

Western Thunderer
Lovely work as ever @jonte . And I applaud your persnicketiness. I guess five dormers makes the roof tie in to the windows and ground floor arches. Which speaks volumes about your artistic eye. Not to mention your talents in three-dimensional realisation.

Cheers

Jan
 

jonte

Western Thunderer
Lovely work as ever @jonte . And I applaud your persnicketiness. I guess five dormers makes the roof tie in to the windows and ground floor arches. Which speaks volumes about your artistic eye. Not to mention your talents in three-dimensional realisation.

Cheers

Jan

Without your impressive command and fluency of language Jan, I cant even begin to provide a suitable and worthy response to your kind and
most flattering comment, apart from to say ‘thank you’.

Jon
 

jonte

Western Thunderer
Work continued on the dormers as planned and I’m pleased to report they are now attached to the roof.

Front:

IMG_4191.jpeg

Rear:

IMG_4204.jpeg

From above:

IMG_4203.jpeg

………and perched:

IMG_4206.jpeg

Not a lot to add apart from the faffing about trying to make the polystyrene parts stick to the backing material of the paper slates beneath.

A test with two-part epoxy provided a solid bond; in practise, it was like placing grease on sled runners, the parts simply sliding off down the slope. I tried to remedy with Gorilla super glue, but the bond took too quickly. In the end, I dabbed both the epoxy and the cyano on, and for some reason, I gotthe best of both worlds. It no longer slid down the roof, and stayed loose enough to place it before it set. Not sure I can recommend this method but it worked. This time, anyway. Still, wish the manufacturer of the slates had gone the extra mile and included instructions. Or a link to a ‘how to’ video on its site. Never mind.

Apart from adding some filling to the joints in the ridge tiles, and some paper to represent flashing around the dormers which I’ll attach after painting, the roof is now complete.

Now to the rear of the building at long last.

Thanks for looking.

jonte
 

Attachments

  • IMG_4204.jpeg
    IMG_4204.jpeg
    326.4 KB · Views: 3

jonte

Western Thunderer
The last couple of days have seen work ‘progressing’ in earnest as I address the rear of the main building.

So working in the confines of a spare bedroom acting as a temporary workshop, on a half moon telephone table purloined from the hallway in lieu of my desk, I have made a start by removing the warped section of clear styrene sheet which was serving as a rear wall for the last couple of years or so (a real struggle indeed, such was the strength of the glues used, compounded by a fear of damaging the frontispiece), and strengthening the whole by putting in place supports and brackets of sorts (strips of cut sections of styrene) in strategic places. It’s proved a bit of a faff as those already in place proved an obstacle to new fabricated sections. Also, checking fabricated bits for size was made more difficult by the restrictions of the small table upon which I was working. Why is nothing ever straightforward……….

The only bonus of all this was that it provided me with thinking time. Even after two years of poring over photos and creating mental images, occasionally at the most inopportune moments, I was still unsure of what I wanted. To that end, I’ve been steadily collecting bags and bags of stuff, including windows of various shapes n sizes and building materials (and the odd tool or two) just in case, most of which won’t get used!

Even so, it’s been eating up most of my styrene stock at a fast rate, such that I’m considering fabricating the final section from foamboard and card, as replenishing supplies not only entails a journey to the nearest model shop when it’s open, but is becoming increasingly a costly affair (the proprietor blames it on Brexit, but I’m sure the manufacturers are North American, so not quite sure how he drew that conclusion?).

Enough waffle; here are one or two images, as a picture etc., etc..

Identifying the best places to put reinforcements as mentioned while trying to navigate the turning of a relatively large building in a small space without knocking over various tools (again) or pots of glue:

IMG_0370.jpeg

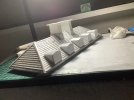
The new fabrications have served to address the out of plumb wall below:


IMG_0371.jpeg

I bought up as many pieces of thick 2.5mm styrene sheet (in fact the last of the stock in the shop!) as this is not only robust but can have thinner sections glued on without warping, and from which I made a new rear wall:

IMG_0369.jpeg

Sadly, I broke into several full sections attempting a seamless butt jointed wall, however, I later realised that none of the sides were truly perpendicular, but only after cutting into them, so I was soon depleting my stock of the larger sections required. Thus, the ‘gaping’ result you see above. This won’t be a problem as this will not be seen as it is merely structural. The rear of the station (I decided)will be represented by the new removable section which will be positioned in front of this ‘wall’. Apart from what I’ve already described, it’s main purpose is to hold up the main roof and support some side rooves which can be seen on the previous images of Blackfriars.

Trying to brace everything while I mark out and try for fit on this postage sized table:


IMG_4192.jpegIMG_4193.jpegIMG_4194.jpeg


As can be seen from the last shot, I eventually knocked over a new pot of glue due to the restricted space which subsequently dissolved my brand new cutting map :rolleyes: There was a bonus to this : the glue handily fixed the new wall to the cutting mat which assisted greatly in marking out new sections inside without falling over.

Ah well, at least I’m going in the right direction and have a better idea of where I’m going.

Cheers for now.

jonte
 

AdeMoore

Western Thunderer
Going well Jon apart from the glue incident! I use the shallow glass desert dishes (once had cheesecake in them I believe nice and handy for ballast holders paint mixing etc,) to help prevent that! Ask me how I know my cutting mat has a similar pattern on it!
Looks like a bigger table is what you need too! FB Hands of Change free or Marketplace for not a lot! Would be my go to. I know not everyone does FB.
Keep at it the move indoors has helped things along of that there’s no question.
 

jonte

Western Thunderer
Absolutely, Ade, and it’s good to know I’m in good company :thumbs:

Top tip, btw!

I’ve tried similar in the past with a spot of blu-tac in the bottom as belt n braces, but as per usual, I was too eager to see this (onerous) bit out of the way so I can get back to the enjoyable part :rolleyes:

I’m not on FB but my wife and daughter are, and I recall my daughter especially using the ‘free stuff’ aspect with the grandchildren. As they (quickly) grow out of toys or whatever, she passes on items they’ve outgrown as well as benefiting herself. Great idea.

Following the spillage, and after seeking assurance that none of it had patterned the carpet :oops:, the boss reminded me that she had asked me if I’d wanted a bigger table, as she was prepared to order one first me, but as usual I wasn’t listening……….

Entirely my own fault, Ade.

Many thanks as always for your kind interest and advice.

Jon
 

jonte

Western Thunderer
Thankfully, I’ve almost reached the end of this aspect of the station building, or at least the frustrating part of shoring everything up whilst adding the rear structural wall.

Several wounds later from scoring and snapping thick plasticard, it’s now as robust as it will ever be:

The interior, warts ‘n’ all:

IMG_4216.jpeg

It’s not going anywhere now and weighs a bit.

Thankfully the walls are plumb on this most recent part of the build:

IMG_0373.jpeg

Just a shame I can’t say the same for the leaning towers which have ‘settled’ after being neglected and unsupported for a couple of years:

IMG_4215.jpeg

Still, in this story it’s a promontory so I guess it’s sinking into the river bed…………..

What it looked like at the end with the side walls fitted:

IMG_4214.jpeg

I’ve taken this idea from Blackfriars.

So on to making the first of the sloping side roofs. In the photos of the building, it appears that the sloping roof is covered in slates, however, the flat section above appears to be lead/copper covered with ducts (?) atop in parallel.

So the roof as a whole was cut from thinner plasticard which made a welcome change from the 2.5mm stuff, and then separated into its sloping and flat parts as described above. A bind to locate without them slipping from one’s grasp, I turned them over and applied a band of masking tape with a tad of cement glue added to keep it there, being careful not to glue it back into one piece! Whilst it was upside down I took the liberty of adding a waste bit of card to avoid warping after the ducting (?) is applied to the top as I don’t trust the thinner card with styrene cement:

IMG_4211.jpeg

Then tried for fit:

IMG_4210.jpeg

Then removed for adding the detail:

IMG_4212.jpeg

And a final one for now to see what it looked like:

IMG_4213.jpeg

Yeah, it’ll do.

On the next visit, I’ll cover the sloping bit with graph paper as I’m going to tile again, although this time with slates cut from graph paper as there’s not that much area to cover and I’ve not enough proprietary slates left over from the main roof.

The exercise will be repeated for the second side roof, at which point I can then turn my attention to the rear of the station which I’m looking forward to.

Thanks for looking.

jonte
 

jonte

Western Thunderer
Work commenced on adding the slates to the side rooves as previous, but rather than hand cut them from paper as planned, I discovered a left over sheet of skates from my first attempt at the main roof. They’re a little larger than the recent batch but I found them far easier to apply.
Incidentally, after realising that their was just enough if the recent batch left I made a start, this time by peeling off the backing, but my, it was difficult to prevent them resembling the shape of pearl necklace around a lady’s neck (I suppose I should add ‘anyone’s neck’ for that matter) whilst trying to lay them straight. Trying to alter them when it occurred was compounded by the sticky backing designed to hold them in place. So into the bin they went promptly. The old set I used were merely glued onto the plasticard surface (sanded first to key) with PVA which was more forgiving.

My earlier concern about using thin plasticard without being reinforced with further layer(s) of plasticard proved correct, as after the PVA glue had dried on the unsupported section below the slates (was surprised that even PVA would have this effect too) I noticed initial signs of warping, so like the section above, I too applied further pieces of card beneath:

IMG_4211.jpeg

Then the roof was attached to the building:

IMG_4213.jpeg

At this point, I made things hard for myself as usual by once more changing tack.

I’d had several ideas about the appearance of the (blank wall) above - the latest being to decorate it with the odd pieces of irregular stone sections here and there to suggest a semi formal construction - but had discounted them all, thinking I could get away with leaving it blank. However, once the roof was in place, it stood out like a sore thumb. But with the roof tight up against the wall, what would be the solution without looking like an ‘add on’ to say nothing of the whole procedure being fraught due to the lack of access now the building was pretty much complete?

In the end, decided just to continue with the Ashlar design sported by the frontispiece. Unusually so, I had a spot of luck when I discovered a long forgotten sheet of paper thin plasticard which I could just manage to squeeze twixt wall and roof as the thicker section styrene strip used on the front was out of the question, but at that point my luck ran out and it proved the PIA I’d expected. Shaln’t bore you, but needless to say, trying to draw straight lines and apply glue was frustrating as mentioned in no part due to size, shape and weight of this plazzy edifice. In fact at one point, I had to glue one of the towers back on…………. Just wish I’d made my mind up whilst it was still apart.

Anyway, for what it’s worth, here is the newly ‘decorated’ wall in question:

IMG_4214.jpeg

Now for the second one.

Cheers

jonte
 
Top