Rebuilt Crosti 9f

Richard Gawler

Western Thunderer
The cost for the bespoke items may well make your eyes water.
Indeed. I made an enquiry for six sets of leaf springs and axleboxes in 7mm scale, and the quote was £260. I can only imagine it would be a very wealthy collector who would be prepared to pay for such things, and as a part of a commission.
 

Yorkshire Dave

Western Thunderer
You are, of course, entirely correct. Some castings and fittings are so poor as to be unusable and there can be no excuse for that. However, as far as kit producers are concerned there's a quality/cost equation. Can something of good quality be produced at reasonable cost? The answer is, as we know from these pages, that it's an equation which can be made to work, but the kits which are available and which are delivered with usable castings tend to be on the more expensive end of the market. Even then they may not be perfect as perfection arguably requires bespoke items often produced as "one offs" - the casting processes are inevitably a compromise to some extent but a 3D print can be accurate to the nth degree. However (as a generalisation) 3D prints are expensive and would add ££££s to the cost of a kit.

Having built a couple of kits by MOK I have to say that I was able to use all the castings although they all had to be fettled to some degree. But those kits are at the top end and can be compared with kits costing half the price but will be (again a sweeping generalisation) half the quality.

Basically you get what you pay for. If you are willing to shell out for bespoke castings most kit producers will sell you "etch only". The cost for the bespoke items may well make your eyes water.

- Without too much divergence from the original topic of this thead - On the other hand what is preventing a kit manufacturer using 3D printing to effectively re-tool the poor cast parts to create new masters for new moulds. The cost can be recovered over time through sales by raising the kit price. In most cases today poor quality cast parts are either due to tired and life expired moulds or a poor master created many years ago.
 

oldravendale

Western Thunderer
- Without too much divergence from the original topic of this thead - On the other hand what is preventing a kit manufacturer using 3D printing to effectively re-tool the poor cast parts to create new masters for new moulds. The cost can be recovered over time through sales by raising the kit price. In most cases today poor quality cast parts are either due to tired and life expired moulds or a poor master created many years ago.
That is, indeed, a valid point, Dave. 3D printing is a very useful tool for producing masters but the production of castings from such masters assume an understanding of metal shrinkage and a knowledge of the appropriate resin for use in the printer. None of this is, of course "rocket science" but it requires a change in traditional direction.

Brian
 

mswjr

Western Thunderer
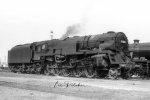
This picture was on a Facebook page, it may be of use to you at a later date. from Les Pitcher Collection.
 

Attachments

  • 357504645_6353612934718775_6418441988089305869_n.jpg
    357504645_6353612934718775_6418441988089305869_n.jpg
    187 KB · Views: 25

spikey faz

Western Thunderer
The valve gear is now assembled! Quite a bit of fettling to get everything lined up, but to my genuine amazement the chassis runs up and down my short test track with no shorting or binding. Phew!!
20230712_090830.jpg20230712_090907.jpg20230712_090951.jpg20230712_091045.jpg20230712_091112.jpg
Yes, I know the paintwork is already looking a bit scabby in places. This due to the inevitable knocks to the chassis during construction/deconstruction. I could have waited I suppose until the chassis and valve-gear was completed before painting, but gaining access to some of the nooks and crannies would have been a nightmare - hence my approach.

Mike
 

chigley

Western Thunderer
The valve gear is now assembled! Quite a bit of fettling to get everything lined up, but to my genuine amazement the chassis runs up and down my short test track with no shorting or binding. Phew!!
View attachment 190185View attachment 190186View attachment 190187View attachment 190188View attachment 190189
Yes, I know the paintwork is already looking a bit scabby in places. This due to the inevitable knocks to the chassis during construction/deconstruction. I could have waited I suppose until the chassis and valve-gear was completed before painting, but gaining access to some of the nooks and crannies would have been a nightmare - hence my approach.

Mike
A job well done Mike

Ken
 

simond

Western Thunderer
The valve gear is now assembled! Quite a bit of fettling to get everything lined up, but to my genuine amazement the chassis runs up and down my short test track with no shorting or binding. Phew!!
View attachment 190185View attachment 190186View attachment 190187View attachment 190188View attachment 190189
Yes, I know the paintwork is already looking a bit scabby in places. This due to the inevitable knocks to the chassis during construction/deconstruction. I could have waited I suppose until the chassis and valve-gear was completed before painting, but gaining access to some of the nooks and crannies would have been a nightmare - hence my approach.

Mike
I was only thinking to myself that the "scabby" paintwork was looking quite admirable. I'm sure a bit of weathering will make it even better!
 

spikey faz

Western Thunderer
I'm in a bit of a quandary. Do I start attaching all the bits of pipework etc now, and then paint everything in one go, or do I paint the boiler/cab/smokebox first and then add pre-painted parts? On previous builds I've tended to go for the latter, as this has allowed for a better paint job on the main body. However, given that this Crosti is going to be subjected to heavy-duty weathering I'm thinking maybe just get everything attached first.

20230714_173615.jpg
Poor quality picture to prove I am actually still working on the model!

Mike
 

spikey faz

Western Thunderer
Mike,
I painted my MOK 9F last week with everything attached. Seems to have worked out well. No photos as I painte the first coat of red onto the buffer beam half an hour ago.
Simon
Hi Simon

I think I'll probably do the same. Otherwise I'll never get the thing finished!

Hope you'll be posting some pictures of your 9f. :cool:

Mike
 

spikey faz

Western Thunderer
I decided the ejector pipework that I put together back in February this year (or was it last year? ;)) needed beefing up a bit. So I replaced it with some larger diameter rod. I also added a representation of some flange connectors by drilling out some crankpin nuts and slipping them into place.

20230714_173615.jpg20230715_195631.jpg20230715_202341.jpg20230715_202458.jpg
Plenty more pipes to add.

Mike
 

spikey faz

Western Thunderer
I must say it is nice to see the whole model
Hopefully I'll be able to show more of it soon. It just seemed to take forever to get to this stage. Partly a consequence I suppose of still holding down a full-time job and thus only being able to put in a couple of hours or so a week on the build.

Mike
 

spikey faz

Western Thunderer
My workbench also doubles up as my office space (when I'm working from home), so I have to clear away all my modelling gear after a loco building session in readiness for boring work stuff. So time lost setting up/clearing away = less modelling time. No big deal (it's not a race!), but possibly another reason for my extremely slow build rate!! :))

Today's progress is below with a couple of small pipes added to the ejector.
20230716_203600.jpg
Also pictured is the conduit that the rebuilt Crostis had. The kit provides a quite nice 2 piece etching for this, but unfortunately the brackets on said etchings don't all line up with the boiler bands. Clearly this is down to my failure to align the boiler bands correctly. Oh dear! So I've made a replacement out of a piece of shallow U-section brass. I've had to anneal part of it to get it to fit snugly round the firebox. Still a work in progress.
20230716_171805.jpg
Mike
 
Top