7mm Rob's workbench - Gladiator J6

Jon Nazareth

Western Thunderer
Hi Jon,

It's a Collet Block, I have square and hex versions. I bought them both together from Arc Euro but they can be bought individually. From Arc you have to buy the nut as a separate Item. I cheap skated and only bought one nut though, as I have couple that came with collet chucks already. I swap between them as I need to.

050-070-10095-Stevensons-ER25-Square-and-Hexagonal-Collet-Block-Set_700x600.jpg


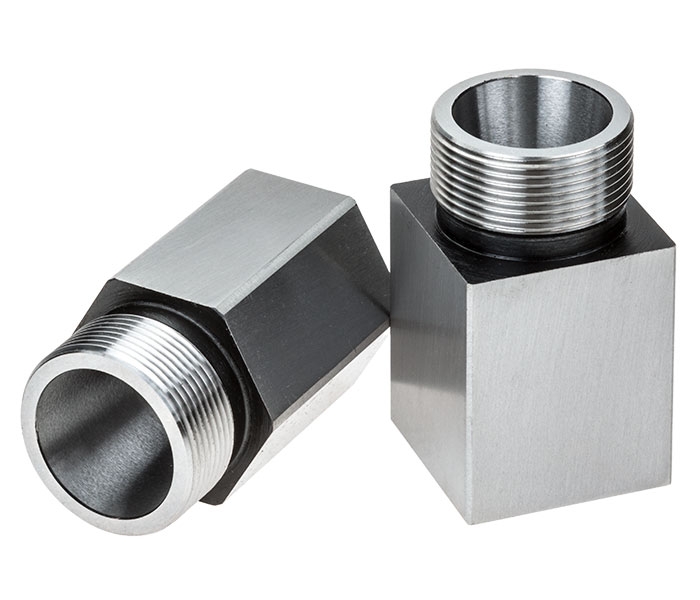
Usual disclaimer, no connection to Arc Euro just a satisfied customer.
Thanks, Rob, I'll have to look them up.

Jon
 

Ian@StEnochs

Western Thunderer
That looks a very smooth coat Rob. My experience with Closterman has not been positive at all. I had read very good reports of the etching black primer but mine came out all gritty almost like sand had been thrown at it. I had to strip both loco and tender and tried again with a fresh can but got the same result. Now back to using Precision two pack!

Ian.
 

Rob Pulham

Western Thunderer
Hi Ian,

I have used it previously but only for painting a loco and tender chassis, I had similar results but the good finish wasn't as obvious because of the small surface area.

I wonder if perhaps you were spraying from a bit far away and the paint was starting to dry before it hit the loco?

I sprayed from at most 6 inches away.
 

adrian

Flying Squad
I had to strip both loco and tender and tried again with a fresh can but got the same result. Now back to using Precision two pack!
I've recently switched to using Zero primers and paints, if I remember correctly following a recommendation from @Brian McKenzie .

They do a 2 pack etch primer but I've just been trying their single pack primer.


Ian@StEnochs

Western Thunderer
Hi Ian,

I have used it previously but only for painting a loco and tender chassis, I had similar results but the good finish wasn't as obvious because of the small surface area.

I wonder if perhaps you were spraying from a bit far away and the paint was starting to dry before it hit the loco?

I sprayed from at most 6 inches away.

I get a glass like finish with Halfords rattle cans and used the same technique with the Closterman!

Ian.
 

Rob Pulham

Western Thunderer
I get a glass like finish with Halfords rattle cans and used the same technique with the Closterman!

Ian.
Hi Ian,

Apologies if I sounded Granny and Eggs, it wasn't my intention. You have infinitely more experience than I, when it comes to painting models.

The question I posed, was the one that was put to me when I had similar results to your Clostermann experience with a can of Halfords on a coach side.
 

Ian@StEnochs

Western Thunderer
Hi Rob,

No problem. I was just a wee bit annoyed when what I hoped would be a time saver turned out the opposite. I still have both the cans, and there is quite a bit still in them, so I may try again. Maybe on hidden bits first!

The Precision etch primer works very well but it is a bit of a hassle with the mixing and air brush cleaning. Fine if it’s a full paint job but for components takes too long. I like to paint as I go along.

Ian.
 

Rob Pulham

Western Thunderer
HI Ian,

One other thing worth mentioning that may have a bearing on the finish. Is that although dry and sunny when I sprayed both the etch primer and the top coat this morning, it was quite cool. I only risked it because I was reading an article somewhere recently about some paints being better when sprayed at lower temperatures.

Although it didn't explain why specifically (and I can't recall where I saw it now) I can only assume that the principle being that the lower the ambient temperature when spraying, the less evaporation/drying of the paint takes place between nozzle and hitting the model.

I must admit, this does seem to contradict everything that I have previously been told about warming models and cans of paint etc. when painting.
 

simond

Western Thunderer
Rob,

Warming the can is going to increase the pressure, and likely reduce the viscosity of the paint.

I’d hazard a guess that it’ll shorten the drying time a bit as the more volatile elements in the solvent will evaporate more quickly, but it might not make much difference if the model itself is quite cool. Once the paint hits the surface, I guess you want time for the droplets to coalesce into a smooth layer before it dries, otherwise orange peel might result. If the model is warm, this might happen more quickly.

the more I think about it, the more I’m astonished that rattle cans are as reliable as they are…
 

Rob Pulham

Western Thunderer
Rob,

Warming the can is going to increase the pressure, and likely reduce the viscosity of the paint.

I’d hazard a guess that it’ll shorten the drying time a bit as the more volatile elements in the solvent will evaporate more quickly, but it might not make much difference if the model itself is quite cool. Once the paint hits the surface, I guess you want time for the droplets to coalesce into a smooth layer before it dries, otherwise orange peel might result. If the model is warm, this might happen more quickly.

the more I think about it, the more I’m astonished that rattle cans are as reliable as they are…
That makes perfect sense but is contradictory to what lot's of people advocate... I am going to stick with the cooler temperatures for my spraying from now on.
 

Deano747

Western Thunderer
...again, not teaching to suck eggs, but this time of year I monitor the humidity and temperature of the workshop. I warm both the can and the model with a hairdryer and wait for a day when the room is 60c or warmer and ideally 60 percent humidity or less. I've never had a problem with Clostermans or Halfords primers straight from the can, but I now favour decanting (and warming) and using it in an airbrush; i find I get a much finer/smoother finish. As always, I'm open to additional advice from experts! :)

Regards, Rob.
 

Rob Pulham

Western Thunderer
In between pressing rivets out on the footplates on the Princess, I did more work on the J6 to relieve the tedium.

Next task was fitting the brakes. I wanted them to be removable so I turned up some hanger brackets cum spacers.

51999758418_934ae992b0_h.jpg


Then I soldered them to the chassis and made up the brakes to hang from them.

51999757948_10076a7a79_h.jpg


I made similar length spacers from tube to sit on the end of the brake cross beams.

51999703536_4a3d5be6a1_h.jpg


51998693422_a089405b11_h.jpg


Finally I fitted the brake cylinders which of course meant milling out the centre of the frame spacer. This seems to be the story of my life recently.
The GA showed some turnbuckle type adjusters so I milled some thick walled tube to represent them.
 

Rob Pulham

Western Thunderer
While working on the brakes I made a small discovery which made things a bit awkward. When rebuilding the springs and dampers from the original Ragstone castings I had set the dampers much too low under the springs. That combined with them being slightly over size and a few of them not quite being round meant that when testing the wheels rubbed on them and the brake pull rods wouldn't seat properly.

An easy fix I thought. I will turn up some slightly smaller dampers which will be round and it should be an easy job to pop the dampers off and reseat the replacements flush under the springs.

Oh no when I tried to get the dampers off I ended up pulling the whole thing apart

52015301979_922304462b_b.jpg


Replacements duly turned I also decided to add the quite prominent nuts on the bottom

52013463890_2e837dd2a8_h.jpg


I decided it would be easier to just assemble the dampers onto some new pins and then fit them to the springs and hangers

52014022872_753381370c_b.jpg


52015301939_2d925d2d3f_h.jpg
 

Rob Pulham

Western Thunderer
This last week also saw the transfers applied to the J6 a Job I always dread...

Not the best photos in the world but you get the idea.

52023790692_419e4d95d3_h.jpg


52024862828_ad96e2ef88_h.jpg


52025341325_61e8a6a555_h.jpg


I also got some paint on the plates and the buffer beams

52020461317_0c12df1648_c.jpg


The loco is to be weathered so I wasn't too fussed that the cover of the white on the numerals isn't perfect.
 
Top