The Heybridge Railway, 1889 to 1913

simond

Western Thunderer
Richard,

the 12BA crank pins will be entirely adequate for the loads involved. I too use 10BA, but Slaters wouldn’t supply 12BA if they kept coming back.

Regarding the wheelspin, this is much of the advantage of the arrangement proposed by Fraser back in post # 117, and my reply to your comments in # 146.

As well as staying on the track, the weight of the loco ideally should be usefully distributed on the driving wheels. With equalisation, possibly two thirds of the weight, or a bit more, can be applied to them, and one third, or a bit less, carried by the trailing axle, and this will remain true irrespective of any ‘umps & ‘oilers, or twist, in the track.

I suspect you have, at least at times, only three wheels in contact with the track, and maybe only one of them is a driver.

The rocking axle will improve matters but only usefully if the trailing axle isn’t holding the middle axle off the rails.
 

Richard Gawler

Western Thunderer
Simon thank you for all of your comments. For the time being . . .
I suspect you have, at least at times, only three wheels in contact with the track, and maybe only one of them is a driver.

The rocking axle will improve matters but only usefully if the trailing axle isn’t holding the middle axle off the rails.

DSC_0027.jpg
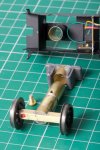
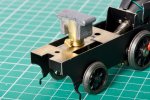
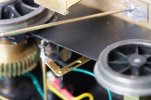
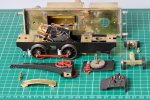
The rear axle can drop like this. It can also rise more than 0.75 mm above the drivers (measured with a strip of styrene) but this is harder to photograph.

When I arranged this, one of my thoughts was that this rear axle shouldn't interfere with a rocking axle at the front.

I don't know how many wheels are on the track at the same time. I want to think always four, usually five. These being three of the drivers and one or both of the trailing wheels. Suppose I arrange some pickups on the trailing wheels and connect the motor to only these, I would find out how much wheel/rail contact there really is at the rear axle. I imagine, if only one driver of a pair is touching its rail then the loco will have a desire to yaw, but maybe this is for only a fraction of a second.

To be honest, the haulage capacity of Nellie is more than adequate for me. If she goes out onto the main line with a tender truck, an open wagon and a brake van this would be fine for me. Still, the more I learn from this the more I will know before I begin my next loco.

I should emphasise - I don't have any aversions to compensation, but this is my first 7 mm loco kit and I have been cautious with the driving wheels.

Edit: and after looking at this photograph I need to go and find at least one crank pin bush :oops:
 

Richard Gawler

Western Thunderer
. . .

Regarding the wheelspin, this is much of the advantage of the arrangement proposed by Fraser back in post # 117, and my reply to your comments in # 146.

. . .

Well, I have never built a chassis with hornblocks. I should try some with scrap brass (before risking spoiling a kit) and see how I get on.
 

Allen M

Western Thunderer
Hi Richard
Congratulations, you have had a go and succeeded with a loco that can do basically the same as the real thing could have done.

I always come back to the comments my late father made some 70 years ago
"Trying and failing is acceptable, failing to try is not"

Regards
Allen
Who can still fail over 75 years since my first Hornby clockwork train set.
 

Richard Gawler

Western Thunderer
Hi Richard
Congratulations, you have had a go and succeeded with a loco that can do basically the same as the real thing could have done.

I always come back to the comments my late father made some 70 years ago
"Trying and failing is acceptable, failing to try is not"

Regards
Allen
Who can still fail over 75 years since my first Hornby clockwork train set.

Thank you Allen for your kind comments.

Sometimes the 'like' isn't enough; I think, absolutely. When I am doing something new on a model I go carefully. If something doesn't work out then (eventually!) I try a different way. After a while, I look for corners to cut and if I get away with it I think, "good". But if I ever think, "I can't be bothered to . . . " knowing full well I should then I have got to stop and leave it a day or two.
 

simond

Western Thunderer
Richard,

perhaps if it’ll balance, try running it without the trailing axle. See if that improves its haulage capacity.

I hear what you say about the trailing axle vertical travel, but iirc, it’s sprung, so it’s taking some weight, and the problem is knowing whether it’s taking 1% or 50% - and it is fiendishly difficult to measure with any accuracy.

But if it is taking weight off the drivers, it’s weight that could be adding to the tractive effort.
 

Richard Gawler

Western Thunderer
DSC_0036.jpg

DSC_0033.jpg

I have just realised, the present arrangement of the rear axle appears in one of the videos but not here.

No spring yet - just an extra weight slipped onto the top. The total weight of the axle assembly is about 45 grams, and the loco runs as an 0-4-0 pulling or pushing this around with it.

Truly, I am happy enough to have seen the limit of the haulage capacity. I could try tilting my test track baseboard to make a gradient one day, but really I want to get Nellie finished off, I think the loco will be fine.
 
Last edited:

simond

Western Thunderer
Ah, my mistake, it’s just a weighted pony truck, if a little unconventional :).

then it isn’t taking any weight off the drivers, and so shouldn’t make any difference. Try it without, if you can, just to confirm.
 

Richard Gawler

Western Thunderer
DSC_0039.jpg
I will have access to the coaches and the track again maybe September.

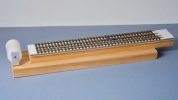
In the meantime, I built this jig a few years ago for 16.5 and 9 mm gauges. The idea is to measure drawbar pulling force. A loco stands on the track and a thread goes from the drawhook over the drum (35 mm film canister) to a tray dangling in front of the bench. You put weights in the tray and see if the loco can pull the tray upwards. Keep adding weight until the loco spins its wheels and won't move.

It was only ever useful for 16.5 mm gauge items. Maybe I could rebuild it for 32 mm gauge. Then I could do some like-for-like comparisons with Nellie and other locos without needing a large track.
 

Richard Gawler

Western Thunderer
I tried something similar about twenty year ago, but never correlated it with pulling a train.

so many variables…
This is a bit poignant to me. I did some tests with a dozen or so RTR models and posted the results on a blog. It was the least-read piece I ever wrote there.
 
. . boiler fittings and crane detailing

Richard Gawler

Western Thunderer
I eventually found the lost crankpin bush (brown on a brown carpet), dropped a 12 BA nut and found another one dropped a while ago. I can think of a good if non-engineering reason to go for 10 BA crankpins next time.


DSC_0040.jpg

I wrote to Jim Mcgeown with an order for a new kit and to ask whether he could supply a stovepipe chimney and a Ramsbottom safety valve for Nellie. The castings arrived yesterday, free of charge. The service and quality from Jim is consistently superb.

Now, I have a feeling these parts are for a loco one or two sizes bigger than Nellie (they are from his J15) but I think they provide a dose of character the model has really needed.

I had already moved the whistle (originally in the middle as post 217) to make room for the safety valve, little knowing the Ramsbottom design has the whistle as an integral part. So Nellie is going to get a second whistle. I don't know whether crane locomotives actually had such a luxury but one note for the loco and a different one for crane operations sounds reasonable to me. And doing this will stop the spectacle plate getting like a piece of Swiss cheese.

I have just broken off the handbrake handle.
 

Richard Gawler

Western Thunderer
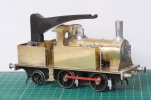
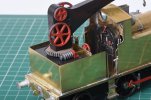
Yesterday evening I put the gears and flywheels onto the crane and reworked the brake gear (a bit sloppy first time round) and I felt I had now worked my way through all of the parts for the whole project and there was truly nothing left.

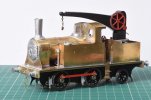
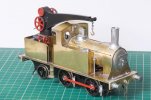
Then my eyes fell on the hook for the crane - the one thing which makes the loco what it is. So this went onto some chain there was one more mix of Araldite to fix the chain inside the jib.

So . . . 'Nellie'; my first essay in 7 mm loco building :drool:

DSC_0047.jpg

DSC_0042.jpg

DSC_0043.jpg

I want to dedicate this build to my two school metalwork teachers from the 1970s. We usually worked with steel because it was cheaper than brass but of course a lot slower to work. I think a lot of my work here, especially for the wheel bearings and new parts around the crane worked out so well because of their advice and encouragement. It is amazing how the useful memories come back.
 

spikey faz

Western Thunderer
Looking forward to seeing 'Nellie' painted.What colour are you going to paint her?

Incidentally I forgot to mention that when I built the crane jib on my model, I mounted the drive gears/flywheels into hollow tubes that I'd soldered into the jib sides. I figured it would help align the parts. Not sure if I was successful in achieving this.

Mike
 

Richard Gawler

Western Thunderer
Looking forward to seeing 'Nellie' painted.What colour are you going to paint her?

Incidentally I forgot to mention that when I built the crane jib on my model, I mounted the drive gears/flywheels into hollow tubes that I'd soldered into the jib sides. I figured it would help align the parts. Not sure if I was successful in achieving this.

Gosh nine 'likes' all in one go!

I think Nellie has got to be blue, to match her Tri-ang R.355 ancestor. I have bought some Precision 'LNER Oxford Blue, satin (dull)' but I quite fancy an aerosol from Halfords named 'engine blue'. Both of these are enamels. I picked up some of the Halfords one on my fingers after someone had clearly just had a go in the shop so I had a sample to take home.

I understand, the GER shade of blue could vary quite a bit so I have some latitude. Nellie isn't a known GER engine of course, but if she resembles a product of Stratford this would be good. I was very impressed by the finish I obtained on the chassis with Halfords enamel matt black, it is tougher than the model paints I have used. A blue will go with the red detailing I have already done, and the red side rods match up with the red ones on my Manning Wardle K class.

For the crane I reamed out the holes in the jib etch so the various gears and wheels were a perfect fit. Then I painted the jib with primer and gloss and had to ream them out again. I fixed them in with cyano, a fairly thick non-runny one applied into the holes. The thinking being, I can probably get them out again one day if I put the crane into very hot water. The cyano sets so fast it was easy to hold them in the right places. I aligned the wheels so the worst of my painting was hidden by the jib :cool:

I would like to leave the body of Nellie unpainted for a while, at least until I can take her to the club meeting in September. So people there can see what I have done and tell me how they would have done it and so on. I have bought Jim's kit for a J15, to build as a Y14 running in the 1890s. This will be an attempt to make a model of a real locomotive as it appeared in service. I might end up not panting Nellie until I have at least decided on the paint for the Y14 - there isn't really any great rush. The Y14 is my Winter project, I have until then to start digging out photos and drawings and perhaps learn some tidier soldering skills.
 

spikey faz

Western Thunderer
Gosh nine 'likes' all in one go!

I think Nellie has got to be blue, to match her Tri-ang R.355 ancestor. I have bought some Precision 'LNER Oxford Blue, satin (dull)' but I quite fancy an aerosol from Halfords named 'engine blue'. Both of these are enamels. I picked up some of the Halfords one on my fingers after someone had clearly just had a go in the shop so I had a sample to take home.

I understand, the GER shade of blue could vary quite a bit so I have some latitude. Nellie isn't a known GER engine of course, but if she resembles a product of Stratford this would be good. I was very impressed by the finish I obtained on the chassis with Halfords enamel matt black, it is tougher than the model paints I have used. A blue will go with the red detailing I have already done, and the red side rods match up with the red ones on my Manning Wardle K class.

For the crane I reamed out the holes in the jib etch so the various gears and wheels were a perfect fit. Then I painted the jib with primer and gloss and had to ream them out again. I fixed them in with cyano, a fairly thick non-runny one applied into the holes. The thinking being, I can probably get them out again one day if I put the crane into very hot water. The cyano sets so fast it was easy to hold them in the right places. I aligned the wheels so the worst of my painting was hidden by the jib :cool:

I would like to leave the body of Nellie unpainted for a while, at least until I can take her to the club meeting in September. So people there can see what I have done and tell me how they would have done it and so on. I have bought Jim's kit for a J15, to build as a Y14 running in the 1890s. This will be an attempt to make a model of a real locomotive as it appeared in service. I might end up not panting Nellie until I have at least decided on the paint for the Y14 - there isn't really any great rush. The Y14 is my Winter project, I have until then to start digging out photos and drawings and perhaps learn some tidier soldering skills.
I've had good results from the Halfords sprays (I'm assuming you're referring to the ones they sell for car body repairs). Just remember you'll probably need to rub each coat down with very fine wet n'dry and lots of water to avoid the orange peel effect. Its a bit time consuming!

Mike
 

Richard Gawler

Western Thunderer
I've had good results from the Halfords sprays (I'm assuming you're referring to the ones they sell for car body repairs). Just remember you'll probably need to rub each coat down with very fine wet n'dry and lots of water to avoid the orange peel effect. Its a bit time consuming!

Mike

DSC_0070.jpg

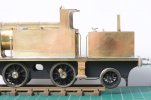
This is a very overexposed shot of Nellie's chassis to try to show the finish I obtained with the Halford's enamel matt black.

I sprayed six passes in all on each surface. Two passes, one in each direction. Waited 5 or 10 minutes, then two more, then another pause and two more passes. The idea is to apply a thick and even coat which is robust. The underlying coats won't run but each fresh coat bonds into them. This was a warm day, maybe 23 degC. The can is 10 or 12 inches from the work, and the paint arrives on the job in a fairly straight line; I'm not letting the paint drop onto the surface.

I am happy with this but of course it barely reflects any light! My painting is usually worse than this and I add a light spray of Humbrol satin or matt varnish (enamel again) to hide the worst of the faults. I would try to use a brighter black in future, this is RAL2005 Jet Black and to me it is too black for a dirty oily steam loco.
 
Top