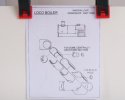
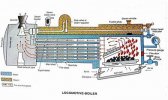
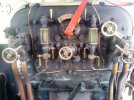
The tube plate is almost certainly upside down, the large hole (B) would have a steam pipe going to that from the dome steam collection, On the backhead the large hole (C) would be the regulator, that too would go to the dome and straight out to the hole in the tube plate, Hole (E) and (F)on the backhead could be a bottom water gauge supply , The hole (D) could be a steam fitting connection for a blower valve , i have seen those on that area. , ill dig out some pictures for you.
You are using an out of date browser. It may not display this or other websites correctly.
You should upgrade or use an alternative browser.
You should upgrade or use an alternative browser.
The Heybridge Railway, 1889 to 1913
- Thread starter Richard Gawler
- Start date
Threadmarks
View all 121 threadmarks
Reader mode
Reader mode
Recent threadmarks
Water column, second attempt NSR low-sided open wagon (c.1880) GER wool wagon (1880) LT&SR horse box (1878) . . unboxing LT&SR horse box (1878) . . build ( Diversion : sixteen wagons at NEEGOG ) GER C53 (1903 onwards) The Beast of Heybridge NewRichard Gawler
Western Thunderer
This is the sort of kit I might imagine suggesting to a beginner wanting to try their first whitemetal kit, but not this one.
Maybe, this kit is actually a perfect introduction to kit building; the parts don't line up, the instructions are wrong and the details are wrong too. All possible troubles together in one compact scenic item

Everything I learn about loco boilers here ought to help me make the backhead for the Y14.
Phil O
Western Thunderer
Yes, I think you're correct, you have fitted the front tube plate upside down. I don't know why they have left a gap down the centre of the tube plate, the only time I have seen that is on multipass marine boilers.
On the backhead D and E are washout plugs. If F was on the corner of the firebox, I would have said mud hole/ inspection holes.
The two items either side of D, would be the bottom of the gauge glass fittings would fit, the top fittings would be approximately 12 inches or so above and I would have expected them to be 4 bolts or two if blanks had been fitted.
Blower and steam injector fittings usually come off the steam manifold, on top of the firebox. Variations are possible on that.
Could you dip the front tube plate in boiling water and remove and then replace it the right way up?
Richard Gawler
Western Thunderer
Could you dip the front tube plate in boiling water and remove and then replace it the right way up?
About an hour ago, I put some Milliput into the unwanted holes in the front tube plate. This usually drills well when set so I can add a hole for the steam pipe with its flange at the top.
I suspect, the alloy will melt before the expoxy glue so I think it will be easiest (if not the most prototypical result) to alter the holes rather than take the tube plate out.
Richard Gawler
Western Thunderer
I can try to drill some fresh holes in the middle of the front tube plate, to remove the apparent gap.Yes, I think you're correct, you have fitted the front tube plate upside down. I don't know why they have left a gap down the centre of the tube plate, the only time I have seen that is on multipass marine boilers.
Okay. I can fill in F and F' and forget they were ever there.On the backhead D and E are washout plugs. If F was on the corner of the firebox, I would have said mud hole/ inspection holes.
But not the three bolts represented in the backhead casting! I can file off the bolt detail so there is none.The two items either side of D, would be the bottom of the gauge glass fittings would fit, the top fittings would be approximately 12 inches or so above and I would have expected them to be 4 bolts or two if blanks had been fitted.
Okay. I can ignore these as long as I don't try to add a manifold.Blower and steam injector fittings usually come off the steam manifold, on top of the firebox. Variations are possible on that.
I'll make a guess, the designer of this kit knew about as much about steam boilers as I did when I looked at the illustration on the box and made the purchase

Phil O
Western Thunderer
Seems like a plan. I would just add, that knocking up some blanks and plugs to fit in or over any tube holes or pipe fittings. Wooden plugs or bungs are tapered and would stand proud of platework by around an inch. Blanks are thin bits of sheet wood and be held in place by a few nuts and bolts.I can try to drill some fresh holes in the middle of the front tube plate, to remove the apparent gap.
Okay. I can fill in F and F' and forget they were ever there.
But not the three bolts represented in the backhead casting! I can file off the bolt detail so there is none.
Okay. I can ignore these as long as I don't try to add a manifold.
I'll make a guess, the designer of this kit knew about as much about steam boilers as I did when I looked at the illustration on the box and made the purchase
Richard Gawler
Western Thunderer
Seems like a plan. I would just add, that knocking up some blanks and plugs to fit in or over any tube holes or pipe fittings. Wooden plugs or bungs are tapered and would stand proud of platework by around an inch. Blanks are thin bits of sheet wood and be held in place by a few nuts and bolts.
I have some wooden cocktail sticks for the bungs but I am jumping ahead of myself, still waiting for the Milliput to cure.
spikey faz
Western Thunderer
But apart from that it's all good!Maybe, this kit is actually a perfect introduction to kit building; the parts don't line up, the instructions are wrong and the details are wrong too....

Mike
Richard Gawler
Western Thunderer
Not sure. The various boiler sections went together egg-shaped so had to be soldered up really well and then squeezed round. This leaves the two large fittings on the top of the boiler, and so far no-one has passed a judgment on theseBut apart from that it's all good!
Mike

Phil O
Western Thunderer
Not sure. The various boiler sections went together egg-shaped so had to be soldered up really well and then squeezed round. This leaves the two large fittings on the top of the boiler, and so far no-one has passed a judgment on these
The front one is the steam dome and the rear one will be where the safety valves go.
Richard Gawler
Western Thunderer
Richard Gawler
Western Thunderer
As Brian has suggested, I would remove the next row of tubes, too. You could add the nuts for the longitudinal stays, to match those on the back head, the horizontal row of 4 nuts. You could also add the washout plugs. The steam pipe would go on the centre line at the top, this would be about 6 inches in diameter and the flange would be about 2 or three inches in front of the tube plate to allow fitting the nuts, when the T piece was bolted on.
. . .
View attachment 183085

My steam pipe is 1/8 inch OD brass tube turned down so I could press two 6BA washers onto it to represent flanges. These washers then soldered on. If the inner flange is non-prototypical, I need it to cover an off-centre and elongated hole in the tube plate.
This task would be perfectly well possible by opening up the washers to fit over the tube but the lathe had more appeal and gave me a shoulder to set the rear washer nice and square.
I am guessing the washout plugs might be short pieces of round bar, about the same diameter as the tube holes (1/16 inch), and protruding from the plate by about half of their diameter?
Richard Gawler
Western Thunderer
Looks like a loco boiler now, well done.
Thanks Phil. I think it will be wise to stop now. If I can paint the model and then add some wooden bungs and boards, I think the model will give the right impression.
Simon yes some more holes would be good, perhaps a smaller diameter, but I would want the tube plate flat on the bench to mark it out for drilling. I don't have much chance of getting them in straight lines on the assembled model, and no detail is better than bodged detail.

The infuriating thing is, when I was browsing through the parts I was going to fit the tube plate the right way up. Then I looked at the instructions and the photo on the front of the box and just blindly followed them. Even the manufacturer of the kit has put the tube plate on upside down

Threadmarks
View all 121 threadmarks
Reader mode
Reader mode


