You are using an out of date browser. It may not display this or other websites correctly.
You should upgrade or use an alternative browser.
You should upgrade or use an alternative browser.
Threadmarks
View all 124 threadmarks
Reader mode
Reader mode
Recent threadmarks
LT&SR horse box (1878) . . part 1 unboxing LT&SR horse box (1878) . . part 2 solebars ends and sides ( Diversion : sixteen wagons at NEEGOG ) GER C53 (1903 onwards) The Beast of Heybridge ( Diversion : 'Lady Marion' with train, SM32 garden railway ) New LT&SR horse box (1878) . . part 3 using solder paste and a RSU New LT&SR horse box (1878) . . part 4 RSU probe rebuild NewRichardG
Western Thunderer
In these circumstances I find it quite easy to jump to a conclusion and then set out to try to prove it. Nevertheless, I have found out three things . . .
(1) Flange / wing rail
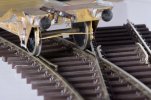
When the Hydra enters the Setrack point from the curved leg, the inside of the wheel flange wants to kiss against the wing rail. This seems to be especially true when the track connected to the point is a Setrack curve connected to give a reverse curve; as though the momentum of the wagon is taking it outwards on the Setrack curve and so the leading wheelset arrives at the wing rail on a slightly off-centre alignment. The effect is, I think (want to think?), reduced when the wagon arrives here from a length of straight track, or when the Setrack curve is connected to make a curve contiguous with the curve on the point. But maybe I am seeing what I want to see - the difference is very subtle.
(2) Check rails
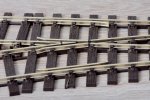
The check rails were free to slide in the moulded point base and this is how I found them.
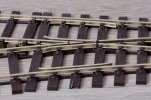
So I moved the check rails to the left so they looked more balanced above the timbers, and fixed them with drops of cyano. I think, the problem is no worse. It is difficult to see how this can make things much better, but maybe the curvature of the nearest check rail matches the curvature of the curved stock rail a tiny bit better. Maybe.
(3) Curved track
No photo needed.
I tried moving my Hydra and my Lomac by hand, backwards and forwards along a Setrack curve. The Lomac runs more freely, and makes less of a noise. The Lomac is slightly heavier than the Hydra (107 g vs 98 g) so more momentum, but the only meaningful difference I can see is in the wheel diameters.
I want to think, the root of the problem with the Hydra is its larger flange chord. Perhaps I have found a sensible maximum rigid wheelbase (130 mm with no sideplay) for running on Setrack curves - this would be useful to know.
I am confident, the Hydra will stay on the track during normal running, and perhaps this is all I really need to know.
(1) Flange / wing rail

When the Hydra enters the Setrack point from the curved leg, the inside of the wheel flange wants to kiss against the wing rail. This seems to be especially true when the track connected to the point is a Setrack curve connected to give a reverse curve; as though the momentum of the wagon is taking it outwards on the Setrack curve and so the leading wheelset arrives at the wing rail on a slightly off-centre alignment. The effect is, I think (want to think?), reduced when the wagon arrives here from a length of straight track, or when the Setrack curve is connected to make a curve contiguous with the curve on the point. But maybe I am seeing what I want to see - the difference is very subtle.
(2) Check rails

The check rails were free to slide in the moulded point base and this is how I found them.

So I moved the check rails to the left so they looked more balanced above the timbers, and fixed them with drops of cyano. I think, the problem is no worse. It is difficult to see how this can make things much better, but maybe the curvature of the nearest check rail matches the curvature of the curved stock rail a tiny bit better. Maybe.
(3) Curved track
No photo needed.
I tried moving my Hydra and my Lomac by hand, backwards and forwards along a Setrack curve. The Lomac runs more freely, and makes less of a noise. The Lomac is slightly heavier than the Hydra (107 g vs 98 g) so more momentum, but the only meaningful difference I can see is in the wheel diameters.
I want to think, the root of the problem with the Hydra is its larger flange chord. Perhaps I have found a sensible maximum rigid wheelbase (130 mm with no sideplay) for running on Setrack curves - this would be useful to know.
I am confident, the Hydra will stay on the track during normal running, and perhaps this is all I really need to know.
simond
Western Thunderer
Presume you have checked that the wheelsets are correctly dimensioned?
BTB is easy to measure but the critical measurement is from front of one flange to back of the other. Assuming the wheels are commercial products, and not obviously faulty, BTB is entirely sufficient, as the wheels will have been turned on a cnc lathe.
it’s an interesting CAD exercise to generate a section of the wheels at railhead level. Is there any gauge widening on the settrack point?
RichardG
Western Thunderer
The wheels are Slater's ones.
On my Hydra the B2Bs measure 1.140 to 1.153 inches at one end and the same within two thou at the other end. This is about 29.0 to 29.3 mm. The variations are because the wheels are not square on their axles. The axles are shouldered to prevent the B2Bs closing up.
The Gauge O Guild manual in its section "Standards - Introduction - 2. Determining standard dimensions - Figure 3" states 29.2 mm for B2Bs. I wish the writers had included tolerances on this dimension . . . perhaps 29.2 mm minimum, 29.3 mm maximum?
The gauge of the Setrack point is consistently very close to 32 mm throughout the parts with fixed rails but drops to around 31.6 mm along the curved blade. I might try bending this blade to add a half millimetre of so.
I don't know how to do CAD so I leave this to someone who will enjoy doing it

Last edited:
simond
Western Thunderer
I believe the 29,2 is a minimum, but as you say, it’s odd that there is no clear tolerance indicated.
Wheels not square on the axles will be a PITA. Not sure what to recommend.
EDIT. - I note the max checkrail spacing is 28.5, which would leave some tolerance room.
Perhaps a word with the Guild tech guys might be in order? @Rob Pulham ?
Wheels not square on the axles will be a PITA. Not sure what to recommend.
EDIT. - I note the max checkrail spacing is 28.5, which would leave some tolerance room.
Perhaps a word with the Guild tech guys might be in order? @Rob Pulham ?
Last edited:
Yorkshire Dave
Western Thunderer
The gauge of the Setrack point is consistently very close to 32 mm throughout the parts with fixed rails but drops to around 31.6 mm along the curved blade. I might try bending this blade to add a half millimetre of so.
I found this with the Peco Setrack O scale points. In the end I bent the curved route blade to widen the track gauge.
RichardG
Western Thunderer
I am reminding myself, I am supposed to be building a model of a light railway set in the 1890s (and a bit later). As such, I would like my trackwork to be code 100 FB rail on 63 mm sleepers (9' sleepers). I have a Marcway 5ft radius point with a 1:5 angle; and the Hydra and every other item of rolling stock I possess will look better running through this (and indeed something similar built in code 100) than through the Setrack point, which is about 3ft 6in radius and 1:4. The Setrack point is letting me get started while I build stock, the layout comes later.
I know I could remove the wheels from the Hydra and buy another set and hope they are a bit squarer on their axles, but I think I should fix on the cast axlebox details and call the model finished and ready for painting. Then I can put up photos of some other models I have made without breaking the continuity here, and begin a fresh model.
I know I could remove the wheels from the Hydra and buy another set and hope they are a bit squarer on their axles, but I think I should fix on the cast axlebox details and call the model finished and ready for painting. Then I can put up photos of some other models I have made without breaking the continuity here, and begin a fresh model.
RichardG
Western Thunderer
I smothered the wagon in neat Viakal and left this for 20 minutes or so before a rinse and rinse again with clean water. I am hoping this removes any remaining flux, certainly it makes the solder oxidise. After I did this in the bathroom hand basin the waste started flowing properly for the first time in weeks so there must be something useful in Viakal. I live in Essex so I have more limescale treatment products than most households in Britain.
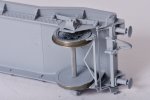
The primer is U-POL number 8 acid etch primer, applied everywhere except the wheel treads masked off with tape. When I used this primer the first time (on my Lomac-L) I sprayed a test piece of fret at the same time. The test piece got a heavier coating than the model. A week later I could not shift the primer on the fret with a finger nail, but there was bare brass showing through on some of the corners of the model. So I think, the primer should go on heavy enough to stay looking 'wet' for five maybe ten minutes. But I do not know about the chemistry involved nor whether this is really the right thing to do.
I sprayed the model inside a large cardboard box in the garden, it was a warm sunny evening about 22 deg C. First the underside, left for ten minutes until I could pick up the model and stand it on its wheels, then the top. The curb rails got a double dose but this might be good for them.
The masking tape came off as soon as I could pick up the model, and then the wheel treads rusted overnight. I guess this is promoted by something in the curing process of the primer? I had cleaned the wheels and darkened them with gun blue before putting them into the model, I thought gun blue gives some resistance to corrrosion. Anyway, I cleaned up the treads with wire wool before these photos.
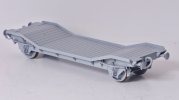
In spite of my efforts I can still see a thin patch but at least this is in a spot where the paint won't rub off.
The black dot is dust on the camera sensor

The primer is U-POL number 8 acid etch primer, applied everywhere except the wheel treads masked off with tape. When I used this primer the first time (on my Lomac-L) I sprayed a test piece of fret at the same time. The test piece got a heavier coating than the model. A week later I could not shift the primer on the fret with a finger nail, but there was bare brass showing through on some of the corners of the model. So I think, the primer should go on heavy enough to stay looking 'wet' for five maybe ten minutes. But I do not know about the chemistry involved nor whether this is really the right thing to do.
I sprayed the model inside a large cardboard box in the garden, it was a warm sunny evening about 22 deg C. First the underside, left for ten minutes until I could pick up the model and stand it on its wheels, then the top. The curb rails got a double dose but this might be good for them.
The masking tape came off as soon as I could pick up the model, and then the wheel treads rusted overnight. I guess this is promoted by something in the curing process of the primer? I had cleaned the wheels and darkened them with gun blue before putting them into the model, I thought gun blue gives some resistance to corrrosion. Anyway, I cleaned up the treads with wire wool before these photos.

In spite of my efforts I can still see a thin patch but at least this is in a spot where the paint won't rub off.
The black dot is dust on the camera sensor

Heather Kay
Western Thunderer
Here just south of the Medway Towns, on top of the North Downs, our bathroom sink's cold tap has almost completely seized up and started growing stalactites. The only cure, apparently, is a whole set of new bathroom plumbing. Goodness knows what the water has done to the central heating system.I live in Essex so I have more limescale treatment products than most households in Britain.
RichardG
Western Thunderer
Here just south of the Medway Towns, on top of the North Downs, our bathroom sink's cold tap has almost completely seized up and started growing stalactites. The only cure, apparently, is a whole set of new bathroom plumbing. Goodness knows what the water has done to the central heating system.

It's almost an art form viewed at the right angle.
At least gold-plated bathroom fittings, much favoured by house builders twenty years ago, have gone out of fashion.
RichardG
Western Thunderer
it’s easy to replace the springs on couplers with a tail-with-holes with a bit of rubber tube, to give some “shock absorption” and on brass kits, you can always solder the hook to the buffer beam.
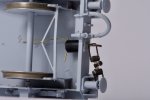
I bought a sample of nitrile rubber pipe (sold for fuel and oil lines) and used a piece of this on a coupler. There is a bit of shock absorbing ability, but I might need quite a heavy train to see an effect. The tube I bought is 5.5 mm OD, 2.5 mm ID, does this sound about right?
GWR 4-plank wagon (1880s) . . part 1 build
RichardG
Western Thunderer
I am also building a GWR 4-plank wagon, this is from the Slaters/Coopercraft kit.
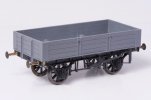
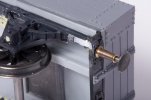
I had some trouble getting the solebars to meet up with the headstocks, and then more trouble getting the filler to stay put. So I added some scraps of styrene across the joins and then rubbed these down so they were like paper. This seemed to tidy things up.
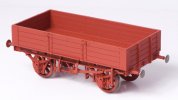
The brake gear is from a Minerva Iron Mink which I am back-dating from BR to 1890s condition. This is a finer moulding than the Slater's one. Also, I knew where to put it onto the model; I couldn't get my head round the Slater's instructions.
A friend has lent me a copy of 'GWR Goods Wagons' by Atkins, Beard and Tourret. Looking at plates 349 and 350, I have a feeling the door springs need to go. This is what happens if you make a model by copying someone else's model and then get the prototype information.
"I expect there are other mistakes I could try to put right if I knew what they were" (suggestions welcome)
I can't believe I have only been here three weeks, I think I will be happy here.


I had some trouble getting the solebars to meet up with the headstocks, and then more trouble getting the filler to stay put. So I added some scraps of styrene across the joins and then rubbed these down so they were like paper. This seemed to tidy things up.

The brake gear is from a Minerva Iron Mink which I am back-dating from BR to 1890s condition. This is a finer moulding than the Slater's one. Also, I knew where to put it onto the model; I couldn't get my head round the Slater's instructions.
A friend has lent me a copy of 'GWR Goods Wagons' by Atkins, Beard and Tourret. Looking at plates 349 and 350, I have a feeling the door springs need to go. This is what happens if you make a model by copying someone else's model and then get the prototype information.
"I expect there are other mistakes I could try to put right if I knew what they were" (suggestions welcome)
I can't believe I have only been here three weeks, I think I will be happy here.
allegheny1600
Western Thunderer
Hi Richard,I can't believe I have only been here three weeks, I think I will be happy here.
It gives me great pleasure to see you enjoying yourself here, it’s great! You’re getting on so well with your kit building, I am very impressed.
All the best,
John
Dog Star
Western Thunderer
Good day Richard,I am also building a GWR 4-plank wagon, this is from the Slaters/Coopercraft kit.
The brake gear is from a Minerva Iron Mink which I am back-dating from BR to 1890s condition. This is a finer moulding than the Slater's one. Also, I knew where to put it onto the model; I couldn't get my head round the Slater's instructions.
"I expect there are other mistakes I could try to put right if I knew what they were" (suggestions welcome)
A fine model which, if my eyes are working today, looks like a candidate for the GWR weak and washy red livery. There is a really good blog entry on RMWeb about building and finishing this kit to an Edwardian condition, see here, although you do not need to reproduce the DC1X brake arrangement - that was the result of a challenge from me to Dave Stone (@wenlock). Chris Brown (@ChrisBr) has been working his way through the GWR wagon registers for historical information about the four plank wagons including running numbers and arrangement of brakes fitted when built and as modified later (sometimes soon after the build date).
RMWeb is the home of interesting, lucid and scholarly discussions about the liveries of GWR wagons circa 1890-1910 including the red paint job - look for a blog entry by Mikkel (@Mikkel). If the weak and washy red appeals to you then asking Mikkel for a link to his discussion of modelling such liveries is worthwhile (PM on WT).
regards, Graham
RichardG
Western Thunderer
I bought a tinlet of Humbrol enamel no. 100 'Red/Brown' for this wagon but I have just found Mikkel's recipe . . .
GWR early red wagon livery
This link having been posted on his blog by the venerable Miss Prism barely two hours ago.
Mikkel's recipe for faded 'Swindon Improved Wagon Red' uses Vallejo acrylics:
GWR early red wagon livery
This link having been posted on his blog by the venerable Miss Prism barely two hours ago.
Mikkel's recipe for faded 'Swindon Improved Wagon Red' uses Vallejo acrylics:
- 3 parts 70908 Carmine Red;
- 2 parts 70829 Amarantha Red;
- 1 part 70918 Ivory.
Notes on railway loco and wagon technology
RichardG
Western Thunderer
Railway wagon technology
This is a small ‘editorial’ post to write a bit about the purpose of this model railway project.
I bought a Manning Wardle ‘K’ class loco, a RTR model by Minerva Models. I rather admired the model, and eventually I bought some track and saw how well it ran. I experimented with different controllers (feedback and non-feedback) and settled on a feedback one from All Components. I sought out reviews of the model and the first one I found said this:
“There's something quite Wacky Races-esque about the nature of the prototype locomotive - its token cab with exposed sides and small spectacle windows, combined with its flared coal bunker and small finescale wheels are humourous in design, but beautifully-captured”.
And I thought, I do not believe what I have just read, I am going to find out about the technology which went into this loco. Manning Wardle built this design for sixty years, what made it so good?
The result was a list of features, which I am uploading here (pdf file) so maybe I will not be the only person who ever reads it.
It struck me, the design development of the steam locomotive was already almost complete in terms of its features, but rolling stock had a long way to go. A Victorian wagon might last 15 years (depending on what it was used for); so if I built a layout set in the 1890s then an 1887 RCH design would be the state of the art and there would be plenty of older designs with dumb buffers to make up a mixture.
The 1890s seem to be rarely modelled, and the mainstream kit manufacturers start their ranges in the 1910s. These are more modern-looking wagons. I want to build some these to gain skills and confidence before tackling older designs. And so, I can try to represent a small railway as it might have appeared over 20 years, a period when railway wagons grew bigger, gained continuous brakes, and more were made from steel instead of timber.
This approach ought to let me possess (and of course build!) a few dozen wagons and choose from these a handful to run at any one time. I already have four wagons from the GWR, but this isn’t quite as absurd as it sounds because only one or two will ever appear during a single operating session. Other wagons can get new roles, for example the ex-Mid Wales break van can be superseded by something more modern and be re-appropriated to become the chief engineer’s personal vehicle (this happened to the prototype). Some of the wagons that arrived here carrying long-distance traffic in the early years can be bought and owned by the railway for service use during later years.
Well this is the idea. It probably sounds a bit academic as written up here but if I draw a line at 1913 and work backwards to the 1870s I ought to be able to create a pleasing sort of variety, and if I build one wagon per month (ten done since last October) I can be busy for years. The layout will be a maximum of 11 x 2 feet (the design is still a bit loose to post here), so perhaps six wagons in operation at a time.
Attachments
Threadmarks
View all 124 threadmarks
Reader mode
Reader mode

