Lancastrian
Western Thunderer
Rob,
I do have spare eccentrics, but they aren't correct for a Lizzie unfortunately.
Ian
I do have spare eccentrics, but they aren't correct for a Lizzie unfortunately.
Ian
Do I have a reputation?Really - I am surprised.
)")
Beautiful! I think this has shown that maybe it’s time for a new kit for this locomotive.I'll take that as a compliment.
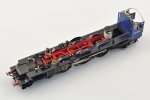
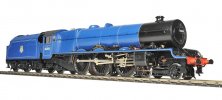
Here's (one of) my finished models. I modified the resin firebox mouldings in the kits. They were quite badly shaped and in retrospect Rob's 3D prints are a much better solution. Printing was in its early infancy then though and the products were very layery and would have required a lot of fettling.

It’s a bigger king !But it's not a Swindon loco Steve
")
Careful Dunhill !I think you mean better king.


Sort of..Rob were they in his spares bucket")