Finescale - of a sort?!

Peter Insole

Western Thunderer
Thank you Brian! I promise, I promise!

There weren't any tears this afternoon either...

It started in smelly - and slightly curling style:
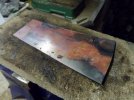
huSAM_yy0815.JPG

The rest happened so quickly that I forgot to grab the camera!

Once it had cooled down, the copper was so nice and soft that I was able to form it all around the timber core with nothing more than a finger and thumb! The only time I used a hammer was to gently, and slightly untidily tap a joggle into the lapped joint - that thankfully will be quite invisible down the back.

The only disappointment was that the flux flowed too freely around the pipe during soldering up, and cleaned most of the fresh "patina" off again when washing!
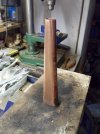
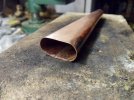
huSAM_yy0817.JPGhuSAM_yy0819.JPGhuSAM_yy0821.JPG

I will have to work out some way of cold "pickling" for the finished pipe to make it go mucky again, as now it has come out so nicely, I don't want to warp it or spoil the solder joint by blasting it all over with the gas torch for a second time!

huSAM_yy0824.JPGhuSAM_yy0826.JPG

I really did think that was going to be a terrible battle, and was being very careful to ensure that I still had enough spare left on the small copper sheet for another go at it!

Still utterly amazed, and quite - well actually I do admit, somewhat more than a bit chuffed with my little chuffer!

Pete.
 

timbowales

Western Thunderer
Thank you Brian! I promise, I promise!

There weren't any tears this afternoon either...

It started in smelly - and slightly curling style:

View attachment 222097

The rest happened so quickly that I forgot to grab the camera!

Once it had cooled down, the copper was so nice and soft that I was able to form it all around the timber core with nothing more than a finger and thumb! The only time I used a hammer was to gently, and slightly untidily tap a joggle into the lapped joint - that thankfully will be quite invisible down the back.

The only disappointment was that the flux flowed too freely around the pipe during soldering up, and cleaned most of the fresh "patina" off again when washing!
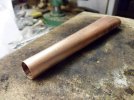
View attachment 222098View attachment 222099View attachment 222100

I will have to work out some way of cold "pickling" for the finished pipe to make it go mucky again, as now it has come out so nicely, I don't want to warp it or spoil the solder joint by blasting it all over with the gas torch for a second time!
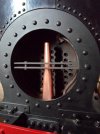
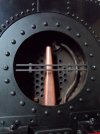
View attachment 222101View attachment 222102

I really did think that was going to be a terrible battle, and was being very careful to ensure that I still had enough spare left on the small copper sheet for another go at it!

Still utterly amazed, and quite - well actually I do admit, somewhat more than a bit chuffed with my little chuffer!

Pete.
Absolutely stunning work, Pete.
 

Peter Insole

Western Thunderer
Thanks Tim T., I still can't believe how I got away with it... and Tony; I still can't believe how long I've been getting away with it!!

Pete.
 

cctransuk

Active Member
Thank you Brian! I promise, I promise!

There weren't any tears this afternoon either...

It started in smelly - and slightly curling style:

View attachment 222097

The rest happened so quickly that I forgot to grab the camera!

Once it had cooled down, the copper was so nice and soft that I was able to form it all around the timber core with nothing more than a finger and thumb! The only time I used a hammer was to gently, and slightly untidily tap a joggle into the lapped joint - that thankfully will be quite invisible down the back.

The only disappointment was that the flux flowed too freely around the pipe during soldering up, and cleaned most of the fresh "patina" off again when washing!

View attachment 222098View attachment 222099View attachment 222100

I will have to work out some way of cold "pickling" for the finished pipe to make it go mucky again, as now it has come out so nicely, I don't want to warp it or spoil the solder joint by blasting it all over with the gas torch for a second time!

View attachment 222101View attachment 222102

I really did think that was going to be a terrible battle, and was being very careful to ensure that I still had enough spare left on the small copper sheet for another go at it!

Still utterly amazed, and quite - well actually I do admit, somewhat more than a bit chuffed with my little chuffer!

Pete.

Try holding it over a smokey candle?

John Isherwood.
 

Peter Insole

Western Thunderer
Thank you for that excellent suggestion John. I might try both the chemical approach (salt and, or vinegar) to get some oxidisation going, then smoke it with the candle!

Pete.
 

Fitzroy

Western Thunderer
Hydaulic pipes and loops. Never seen a loop on an aircraft hydraulic system and, trust me, aircraft are full of vibrations at loads of different frequncies. My suggestion is that it has to do with the range of temperatures and thus expansion that the system experiences.
I've seen a lot of loops on aircraft hydraulics. Sometimes to allow for installation stresses or differential expansion and contraction, sometimes to allow for relative motion of components.
 

Fitzroy

Western Thunderer
Peter, there are a heap of different antiqueing chemicals available for copper and bronze, giving all sorts of variations on patina and verdigris. I'm sure you'd find something that would work if the vinegar etc didn't. But I'm sure it will. Your little loco is looking very lovely!
 

Overseer

Western Thunderer
A search for patination fluid or antiquing fluid, or tourmaline, or combinations of these words will find a number of UK suppliers who offer a range of colours. You won't need much to blacken the copper. Birchwood Casey Brass Black will also work well but probably more expensive. Vinegar won't blacken copper, it will clean it and make it brighter.
 

Peter Insole

Western Thunderer
Thank you both for the tips Fitzroy and Overseer. I thought that about the cleaning effect of vinegar too, but just didn't question it when posting. Strange really, as I now recall pinching some out of Mum's kitchen cupboard and using it to shine up old pennies!

No change there then?!

Pete.
 

mickoo

Western Thunderer
You could drill the lapped joint, say five or six holes and bolt (6BA) it together and then reheat it, the joint won't split then.

Once done just take the bolts out and leave the holes, they're at the back and won't be seen; the other option is to drill and pop rivet.

I know your 'inner you' will niggle at the thought of holes or rivets on the back, but sometimes you have to let this go in the face of the gains you'll get from heating it to get the right patina.

Failing that, tool clamps top and bottom might hold it well enough when reheating, but I'd go with brass bolts and then perhaps just file the heads off the outsides when finished the inside nuts and stub will be soldered in place anyway from the previous soldering.
 

Tim Watson

Western Thunderer
It’s all looking bang on the nail, Peter, and those copper pipes look neat enough to me for a working engine. I too find that copper can have strange health effects for me. I work on it carefully, avoiding powder aerosols. The oxide (verdigris) is particularly bad for me.

Tim
 

Peter Insole

Western Thunderer
I do think that brass rivets on the back would be the best option Mick, and as you say, will not be at all visible! Many thanks for that suggestion.

Thank you too Tim. It does seem to be mainly the effects of the fumes from heating it that causes problems for me! I do try and remember to make sure of maximum ventilation at the workbench when annealing brass or copper - and that goes for soldering too!

Pete.
 

Peter Insole

Western Thunderer
Ah well, while still working on the blast pipe, I have been battling with the niggling knowledge that the steam pipe in the smokebox is tad on the undernourished side.

Old 9mm copper pipe I have in abundance, but a minimum of 10mm should be much more appropriate according to all the drawings. After a rummage, I found a short length of former gas pipe, and that even had a nice, fairly sharp, 90 degree bend at one end.

I did get caught out by the larger internal diameter when annealing it though... There was a very loud bang as I dipped it in the bucket of water, and a jet of filthy black, boiling water shot right across the workbench. Fortunately, I had a firm grip on the glowing hot pipe with a pair of plyers, and was not facing the open end either... but parts of the wall and all my tools copped a dreadfully mucky splattering!

It was quite a bit harder to bend, but I am a lot happier with the end result now:

huSAM_yy0829.JPG

Getting the previous fitting back out was a trial - as I habitually tend to overdo it somewhat when trying to make sure things are permanent!

The confined space within the smokebox meant that I had to drill up through the bottom centre of the old pipe (hence the copper shavings and ragged far end in the above image) until the bit broke through, and then I was able to snap it and twist the upper section free from the tubeplate!

huSAM_yy0831.JPG

Now I really must get back to dealing with the problematic base of the blast pipe!

Pete.
 

Peter Insole

Western Thunderer
While I was still quite pleased with the burned effect on the new steam pipe, I gave up trying to replicate the finish on the blastpipe! Having decided I would probably have to use paint instead, I felt it would be a good idea to keep the momentum going by completing the fitting.

Unfortunately I have never got around to acquiring a 90 degree drill adaptor, and not feeling confident enough to accurately mark out the centres on the outside of the barrel, I had to work four pilot holes by hand - two for the fixing studs and two more for the bifurcating exhaust ports!

huSAM_yy0834.JPG
huSAM_yy0838.JPG

Once I was happy that the baseplate was correctly seated, I was then able to mark out the angled alignment of the ports.

Still a bit fussy for something completely unseen I know, but as mentioned before, it might be a lot less trouble already having clear passageways if I do ever decide to install a smoke generator in the steam chest.

huSAM_yy0839.JPG

Finally I recalled that absolutely everything inside the box would have been covered in a fairly uniform layer of adhering char, regardless of the materials beneath, so a thick coat of enamel paint, mixed to a previously matched, (from a prototype) brownish grey shade was sloshed about all round...

huSAM_yy0850.JPGhuSAM_yy0853.JPGhuSAM_yy0854.JPG

I have left the washout plugs in genuine tarnished brass - just assuming that they are fairly fresh replacement items amongst the ingrained muck!

The camera doesn't seem to have picked up the warm, reddish tinge in the last three images, and thus gives the impression that everything is much too blueish silver, but hey - ho!

It really could do with something distinctly gritty in the bottom now though!

Pete.
 
Top