LNWR Precedent

Mike W

Western Thunderer
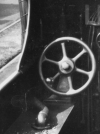
Returning to the subject of ths thread(!), I never knew there was a "boiler certificate holder" in the cab. Presumably then every locomotive needed to carry the certificate with it? I'd never thought about that and wonder when it was introduced - any ideas?

I wonder if its a fairly modern insurance requirement and in the steam era would the railways have self-insured as larger firms do their motor vehicles today? .. and therefore not need it?

Mike
 

NickB

Western Thunderer
Mike,

Now that I've gone to the trouble of making the @*|X%$ thing, don't go and tell me it was a modern addition. Oh well, it won't be very noticeable among all the other clutter in the cab.

Nick
 

adrian

Flying Squad
Mike,

Now that I've gone to the trouble of making the @*|X%$ thing, don't go and tell me it was a modern addition. Oh well, it won't be very noticeable among all the other clutter in the cab.

Nick
I'm not so sure - not totally definitive as it's rather murky but the LNWR archive has a cab photo of Gladstone where the driver and fireman aren't blocking the controls. If you squint you could convince yourself that there is a small riveted component there.


Screenshot 2024-01-13 at 11.02.00.png
 

Mike W

Western Thunderer
Apparently boiler certificates have been a legal requirement since at least 1887. I didn't know that.

So I think you are safe with your holder, Nick.

Mike
 

NickB

Western Thunderer
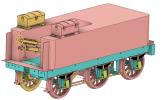
First it was freezing cold, and now half an alphabet of storms have blown over, so I've left the workshop for the time being and have been working in my warm office on the solid model of the tender. It isn't and won't be a complete model. I have concentrated on those parts that I plan to get made and omitted a lot that I know I'll be making myself.

Screenshot 2024-01-19 123859.png

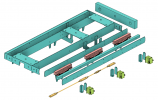
Most of the work has gone into the chassis. Almost everything you can see here will be made by laser cutting (the flat parts) or 3D printing (springs and axleboxes).

Screenshot 2024-01-19 123017.png

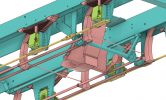
Another concern was fitting everything together, particularly around the water scoop where it and its actuator, the brake rods and their actuator, and the axlebox keepers all get a bit close. At the same time, I've tried to work out how it can all be assembled and disassembled. I had to leave off a couple of minor details, which I hope are inconspicuous, because it was just too difficult to fit them in. I'll leave it to the LNWR experts to see if they can spot what they are.

Screenshot 2024-01-19 124101.png

Nick
 

Mike W

Western Thunderer
Don't look at me Nick - I'm not an expet at anything! But be aware that under Hardwicke's tender the flanges of the rear wheels have gouged chunks from the lower edge of the buffer beam, so with even slightly out of scale model flanges you might want to make a compromise there.

Mike
 

NickB

Western Thunderer
Yikes! You are, of couse, quite right, it should be 10 spokes. I made the same error in the leading wheel of the loco, so that will have to be replaced. And that happened (I think) because the GA of the Precedent has all the necessary info on the wheel centre except the spoke number which I got from another drawing rather than do the sensible thing and count spokes from a photograph. The second drawing is from a primary source (the OPC collection and stamped with the company name) but I now realise that it isn't a working drawing but made for some other purpose.

All of which goes to show you can't be too careful. I'm very grateful to Mike for catching it before it was too late.

Now, who here remembers the late Peter Denny's remark that you can't count the spokes when the wheels are turning?

Nick
 

NickB

Western Thunderer
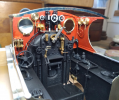
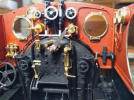
Yay! The cab and backhead are finished at last. There were so many details to do, everything had to be done in the right order and painted as we go because there is no hope of painting them afterwards. (There's still some painting of the more accessible parts to be done). The pipework is a real cat's cradle and I bet it drove the Crewe fitters as nuts as it did me. Most of the pipes had to be made two or three times before I got them right. They are mostly copper but some are brass where I didn't have copper wire of the right diameter.

Cab interior 1.png

Cab interior 2.png

I'm still not entirely pleased with the steam fountain. The handwheels and levers look somewhat coarse. As previously discussed, that is because I was pushing the limits of the printing process. In the end I decided to put up with it because, when I put the cab roof on I realised that it wasn't as obvious as it is in the photos. But if I were doing it again, I would get a casting made. Not only for the sake of appearance, but also because I could then solder all the pipes to it. As it is, they had to be glued, and plastic doesn't take well to being glued to metal. When I made the solid model I included holes for the various pipes sized so that the pipes were a good push fit. The inherent elasticity of the plastic allows that and it is probably that more than the adhesive that is holding them in place. Some of them are so wedged in place between other bits that they won't move anyway.

Nick
 

NickB

Western Thunderer
The loco has now gone to the paint shop, where it will be for some time because painting isn't my favourite task and I'll happily take any excuse to do something else. The present excuse is that bits for the tender have arrived and are just asking to be worked on.

The wheels, as before, have 3D printed nylon centres. Previously, I made the tyres for the loco wheels from some large diameter steel bar. This time I got blanks laser cut in steel. It actually worked out roughly the same price (large diameter bar isn't cheap) and should be quicker to cut because there is much less material to bore out from the centre.
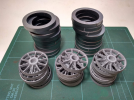
Carrying wheels.png

So why so many wheels? Well, I decided to get enough parts for two tenders. The LNWR must have built lots of these tenders because I've seen photos of them trundling around behind many different classes - so I have options for future (undefined) projects. I might even build two because it's usually quicker to build together rather than one after another. I also needed a new wheelset for the loco to replace the existing one that has the wrong number of spokes (oops), and I added a few more just because. Actually I think I got a price break on either the centres or the blanks. It's worth seeing where this cuts in when placing an order.

Along with the tyres, I ordered the steel parts for the tender frames. Again there's enough for two tenders. When I get bored of turning tyres I can start assembling this lot.
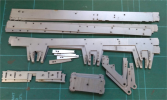
Tender frames.png

Nick
 
Top