7mm Mickoo's Commercial Workbench

65179

New Member
I just pointed it out because it's one of those things that once seen you can't unsee. All ROD tenders built for the O4s are 4000 gallon. ROD tenders were supplied with short coalguards as were all the the GC 4000 gallon tenders up to approx the D10s, although the B8s delivered at approx the same time had the long coalguards.

The photo you posted shows a short coalguard tender. It's the taper on the flare of these tenders that makes them hard to distinguish from the long coalguard tenders.

All in all a lot of work to change, and something that most people will never notice. However, I mention it in case it's useful for future tenders!

Simon
 

mickoo

Western Thunderer
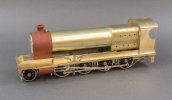
More Gladiator ROD, slow week sadly for a multitude of reasons. I wasn't happy with the smoke box wrapper and the end result to be honest, you need to be Popeye to form it and then once fitted to the inner tube there's no wrapper step at each end.

It sat on my bench for a few moments......then it was therapy session time with a big (very) hammer; after that I did what I should have done in the first place, let the Lego monkeys bash the keyboard for a few hours.

I've kept the kit snifting valve (lovely casting) and smoke box door, though I may change the door; not because the kit one is flawed (it's perfectly good) but because it doesn't have the bolted hinge bracket that 63601 and some other engines had.

The firebox is equally monstrous to form and even annealed it was battle royal to bend it neatly, it still needs a lot of dressing with the big files and power tools to smooth nicely, but the shape is there and between the two I could trim the boiler tube to fit; all be it in levitating mode. I'm not fixing the boiler in yet as I've a feeling something else later is going to need it not to be there, it needs to come out anyway to drill and fit the drain fitting at bare minimum.

The cab roof as Tony Geary mentioned is a bit of an armful, like the smoke box I should have just started from scratch (commercial build perspective, not hobbyist) with a new roof in 0.25 NS, new ribs and new straps. The brass half etched roof is commendably thin at the edges, but with all the strength of a KitKat wrapper, very easy to bend out of shape and harder to straighten.....and yes, mine needs more work to straighten it out.

Mind the real engines are battered to pieces here, probably for the same reason, thin overhanging sheet metal. There are several different (subtle) shapes to the edge of the roof, most are flat, some are curved (some angled) as Tony noted and some are cut short, I chose the latter as it's a smaller risk of damage later on.

Inside the cab I fitted new 3D sand boxes to a different profile matching 63601, I've seen the same rear ends on other BR engines (glimpses from rear angle photos) but I'm not sure how common these were. The new 3D sandboxes also have the full length box under the tool boxes and the driver sides top is extended rearward to form a seat behind the reverser.

IMG_5531.jpg

IMG_5532.jpg

IMG_5533.jpg

IMG_5535.jpg
 
Last edited:

Richard Gawler

Western Thunderer
I wasn't happy with the smoke box wrapper and the end result to be honest, you need to be Popeye to form it and then once fitted to the inner tube there's no wrapper step at each end.

Curious . . . would a set of rolling bars have formed the smoke box wrapper? (I am guessing they would, but you still wouldn't have been happy)
 

mickoo

Western Thunderer
Curious . . . would a set of rolling bars have formed the smoke box wrapper? (I am guessing they would, but you still wouldn't have been happy)
They did and that's what I used but it was the tighter short one at the saddle that was not playing ball, the etch wrapper has a double row of half etched rivets on the inside here and the skin was rippling. Even without that, the wrapper is too long and the tube inside too short to get the lapped joint I needed.

You could lengthen the tube if you can find the same diameter but then it will be too long or you can shorten the wrapper but then the rivets are right on the end, the only solution is to cut a new one slightly smaller and then form and punch all the rivets out.....the Lego monkeys are more efficient :thumbs:

At the end of the day, it didn't matter how neat or easy it was to form the wrapper it was going to be wrong whatever happened......and....if I had spotted that before I'd started I wouldn't even have started so to speak.
 

mickoo

Western Thunderer
There is something very satisfying about 3DP rivets. They’re just so right.
Absolutely, better yet you can print bolt heads, make sure you turn each one as the eye will pick up instantly any that are the same orientation (especially next to each other) and throw your optics.

On this one I blended the chimney into the unit to get a perfect flange joint and then sleeved with brass tube (which was a fraction under sized and hence the small gap)which will be filled and blended smooth. I'll take the slightly smaller bore for the added strength and am looking for even thinner walled tubes to make the bore closer to scale, unfortunately not tapered, unless I can find a way to taper thin walled tube.

I've been playing with new settings and it's almost perfectly smooth, the filler primer helps but the raw surface underneath was the best I've managed yet. There's a small amount of 50 micron layers just visible on the smoke box face top edge (above the central handrail fixing) where the wrapper is lapped, a quick rub with some 1000 grit will get rid of those. They're only there due to the rounded edge, if it had been sharp like the wrapper they would not be present.

At 30 microns I think they'd be almost invisible but that'd push the print time up from 11 hours to near 19-20, I can't justify the extra 8-9 print hours to fix something that'll take seconds with wet n dry ;)

27d41fee-61bf-44b1-8e30-94bb9a430436.jpg
 

adrian

Flying Squad
lots of goodies for several projects but mainly the new Precursor frames.
Reassuring for me that the bits I've cut out bear a passing resemblance to these components.

Only item I wasn't sure if you were planning on replicating is the attachment of the rear frame, I couldn't see anything on the etch for it. On the overlap under the cab the GA drawing shows 3 layers of frame plates. So the rear isn't a straight overlap but has an additional plate in the sandwich so the rear frame is narrower at 3'10" compared to 4' between frames at the front. That's if you want a 1mm of float on the rear truck.
Screenshot 2023-12-13 at 00.29.41.png
 
Top