7mm Rob Pulham's Work Bench - Back (again) to the LNER 06 (MOK 8F)

Tony West

Western Thunderer
Cheers Tony,
It was Geoff/Gladiator that I had in mind, my B2 is a Gladiator kit and while having a look last night discovered that the kit has too screw reverser's included (slightly different, see below)
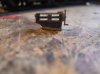
The two white metal reverser's are the ones from Gladiator and the brass one is from the spares box. All I need to do now is work out which B2 I plan to model, find out which of the reverser's is best fit and then use the other for the J63 - simple really:confused:
Rob,
found a slightly damaged example of a GC screw reverser, possibly the one on the right of your photo could be altered to something like !!. Slightly more worrying is that incorrect patterns of reverser have been included in a kit for a Class 1 and as far as I'm aware all GC reversers had a longditudinal top strap.
As an alternative you could try David Andrews for the castings ...always very helpful !!.
Cheers Tony.
J63Build005-4.jpg
 

Attachments

  • gc screw rev.jpg
    gc screw rev.jpg
    222.4 KB · Views: 13

Dog Star

Western Thunderer
found a slightly damaged example of a GC screw reverser, possibly the one on the right of your photo could be altered to something like !!. Slightly more worrying is that incorrect patterns of reverser have been included in a kit for a Class 1 and as far as I'm aware all GC reversers had a longditudinal top strap.

Thinking about this comment... I went back to the Transport Archive website (ref in an earlier post) and looked at the reverser on each drawing.... and then did the same for each drawing in the Irwell book on GCR engines. From what I can see - and with a little bit of GWR input - there is an element of truth in what Tony says and yet the castings are probably correct. How so? Well, my guess is that the top plate of the prototype was marked with the cut-off values and might be brass... or could be steel - either way the top plate is not load-bearing and was likely to be bolted to the top of the reverser frame casting. So, Rob, have a look in the Gladiator kit for a rectangular etch plate with a slot along the longitudinal centre.... and something which might represent a pointer to move in the slot.

BTW - if these tank engines were designed for shunting in the docks... then wisdom suggests that the engines ought to have had lever reverse.

regards, Graham
 

Tony West

Western Thunderer
Thinking about this comment... I went back to the Transport Archive website (ref in an earlier post) and looked at the reverser on each drawing.... and then did the same for each drawing in the Irwell book on GCR engines. From what I can see - and with a little bit of GWR input - there is an element of truth in what Tony says and yet the castings are probably correct. How so? Well, my guess is that the top plate of the prototype was marked with the cut-off values and might be brass... or could be steel - either way the top plate is not load-bearing and was likely to be bolted to the top of the reverser frame casting. So, Rob, have a look in the Gladiator kit for a rectangular etch plate with a slot along the longitudinal centre.... and something which might represent a pointer to move in the slot.

BTW - if these tank engines were designed for shunting in the docks... then wisdom suggests that the engines ought to have had lever reverse.

regards, Graham
Graham,
I have to say that in my years of building GC locos, Ive only found a reverser casting as per my photo. As for finding a suitable etch lurking ...I ve never yet found one let alone found a listing in the parts lists enclosed with the kits.
I do agree with your thoughts regarding the top 'strap'......what have I said !!!!!...must be something in the water !!!.
As to the 'logic' of a lever reverser, look at crewe practice with the special tanks etc, management certainly made sure that the loco crews on shunting shifts earned their money .
A thought !!.....anyone got a cab photo of Butler Henderson ???.
Cheers Tony.
 

Rob Pulham

Western Thunderer
Thanks Tony, Thanks Graham.

I agree with the thought about lever reversers but according to the RCTS green bible only the one had a lever reverser. I did do as Tony suggested and found this picture of Butler Henderson's reverser.

GCR Screw Reverser.jpg

I reckon with a little bit of effort I can make either of the ones I have a little more prototypical.
 

Rob Pulham

Western Thunderer
Work recommenced on the J63 yesterday, with more of the finer details and the cab added.

J63Build001-5.jpg

J63Build003-6.jpg

J63Build004-5.jpg

Ideviated slightly from the instructions at this point, in so much as I built the brake standard as per. But used a casting from the spares box for the handle - it is sugested that you make one up from wire but no further detail than that.

J63Build002-5.jpg

J63Build005-5.jpg.

The plan at the moment is to build all as per the instructions and then scratch build the condensing pipes last.
 

Rob Pulham

Western Thunderer
Yesterday, despite my "plan" referred to in the last post. Once I started to add the castings, I decided that while the chimney,etc just needed cleaning up other bits were not so good.

The lubricator valves on the sides of the smoke box are quite prominent in the photos and while the castings are not bad they are quite plain. So I decided to see what I could come up with from some etched hand wheels and bits of rod and tube.

J63Build001-6.jpg

Once I was happy with these I added the steps, coal rails, cupboard in the cab (to which I added some handles from brass pins with filed down heads), and the castings that came with the kit.

J63Build005-6.jpg

J63Build007-2.jpg

J63Build003-7.jpg

J63Build004-6.jpg

In addition to these I also added a clack valve and vacuum ejector from a set of Connoissuer castings (I am not too happy with the lie of the pipe for this so I plan to take it off and do it again).

J63Build006-5.jpg

J63Build008-2.jpg

J63Build009-1.jpg

On the shelf at the back of the cab were two unidentified holes which a further read of the instructions state are for sand box levers not provided so again I knocked some up from 0.8mm rod a handrail knob and a small washer - probably not quite prototypical but infinitely better than a hole....

J63Build011.jpg

J63Build012.jpg

J63Build013.jpg

Then while waiting for the glue on some of the castings to dry I took the chassis apart to add the final details to that.
 

Ressaldar

Western Thunderer
Hi Rob,

at this rate, it will be finished and painted by this weekend, so by Halifax, it will be well run-in and weathered:thumbs::thumbs::thumbs: Cracking job mate - well done.

cheers

Mike
 

alcazar

Guest
I have to admit, I tend to do the same with "plain" castings.

My first ever loco kit was a DJH Peppercorn A1. I rejected the cylinder drain cocks and pipes and knocked some up out of copper wire, brass rod, crankpin washers and two VERY tiny strips of copper foil.
 

David Taylor

Western Thunderer
Good idea with the handrail knobs and bent wire - I'll steal that. I like to lubricators too. I'm surprised the castings in the kit are so plain and blobular.
 

Rob Pulham

Western Thunderer
Hi Rob,

at this rate, it will be finished and painted by this weekend, so by Halifax, it will be well run-in and weathered:thumbs::thumbs::thumbs: Cracking job mate - well done.

cheers

Mike
Cheers Mike, I hope so but it will depend on how I get on with the condensing pipes and whether Geoff at Gladiator will sell me a GCR smoke box door dart casting.
 

Tony West

Western Thunderer
Cheers Mike, I hope so but it will depend on how I get on with the condensing pipes and whether Geoff at Gladiator will sell me a GCR smoke box door dart casting.
Rob, hobby horse also do a GC/CR type wheel and bar casting, should you get stuck !.
Cheers Tony.
 

Rob Pulham

Western Thunderer
Rob, hobby horse also do a GC/CR type wheel and bar casting, should you get stuck !.
Cheers Tony.
Cheers Tony:thumbs:
I must be blind, I looked at Hobby horse before considering Gladiator but aome how missed them:oops:. The good news is that Geoff from Gladiator relied this morning to an email that I sent last night and he will take one to Halifax for me.
 

Rob Pulham

Western Thunderer
More progress, the chassis is now finished and hope to have it primed and painted tonight.

I fitted the front splashers to the chassis as shown in the photos in the instructions (the instructions do make comment that you might want to attach them to the body) then found that I couldn't get the wheels back on so I removed them again and attached them to the body.

J63Build001-7.jpg

J63Build002-6.jpg

J63Build003-8.jpg.
 

David Taylor

Western Thunderer
Looks great Rob. Except you've built it upside down...

I've just read back a few pages and not seen the axleboxes and bearings mentioned. Did they come with the kit or did you make or buy them?

Regards,
David.
 

Rob Pulham

Western Thunderer
Looks great Rob. Except you've built it upside down...

I've just read back a few pages and not seen the axleboxes and bearings mentioned. Did they come with the kit or did you make or buy them?

Regards,
David.

Hi David,

The axle boxes are part of the kit, but I thought that the bearings provided (you get everything in the kit including motor wheels and gear box.) were a bit on the flimsy side. So I used some that I had spare from my tram engine kit which I had replaced with roller bearings.
 

Rob Pulham

Western Thunderer
Hold on, technology alert!!!!!!!!!!!!!!!!!!!:eek:

Roller bearings? when did that bit of kit get fitted to Toby?:thumbs:

regards, Graham


Hi Graham,

I replaced them as I built it - I am sure I mentioned it during the build (having checked back, I did post #259:) ) I also used some brass tube over them to create a pivot for crude compensation.

I plan to do something similar on my Connoisseur "Nellie" when I get to it.
 
Top