You are using an out of date browser. It may not display this or other websites correctly.
You should upgrade or use an alternative browser.
You should upgrade or use an alternative browser.
simond
Western Thunderer
Chris,
Yes, they are cut from grey slightly “metallic” card from the local craft shop. Also available from “payperbox.co.uk”.
Happy to post the DXF if anyone wants a copy.
The slates are Duchess (24”x12”) with a 10” gauge (ie 4” nailing margin, ten inches overlapped, and ten inches showing). I get 7 rows with a 10.5“ wide slate at the right, and 7 with the wide one on the left. The laser tends to scorch the underside where the beam scatters off the support honeycomb, so it’s not practical to flip them over.
I did the CAD yesterday evening and ran 12 or 13 sheets this morning, a couple of sheets were scrap, one was my fault, the other was a “WT..?”
Sticking them down with cheap “school” PVA, seems to work OK.
LarryG
Western Thunderer
One route is not to give the slates too much thought. Unlike tiles, slates look okay rough and ready.
I have a tin of neat PVA, large brush and a saucer of water. PVA is slapped onto the roof or next row of slates. Each strip is dragged through the water and wiped between finger & thumb and a brush load of PVA applied before placing it on the roof. I carry on with the glue and slap down until one side of the roof is done. The building is then placed on a household radiator where the slates shrink and all looks well when dry.
I work fast before the card 'slates' start delayering.
simond
Western Thunderer
Thanks Larry,
you’ll recall that I know that your slates look pretty good on a couple of buildings that are waiting to grace my layout…
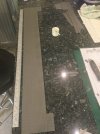
maybe I am overthinking it, but this seems to be progressing pretty well, so I’ll stick with it. Just to amplify my earlier comments, here’s a picture of an A4 Sheet of lasered slates, and a single strip which has the slate-and-a-half on the left.

I can now cut the four lengths required for one row, and stick them down to the base, prep, glue and repeat. It’s SO much easier not doing this on the actual building, and presuming nothing has changed the size & shape of the base, it’ll fit when I’m done!
There does seem to be a tendency for the slates to curl up a bit, but the rice, pasta etc seems to deal with that.
you’ll recall that I know that your slates look pretty good on a couple of buildings that are waiting to grace my layout…

maybe I am overthinking it, but this seems to be progressing pretty well, so I’ll stick with it. Just to amplify my earlier comments, here’s a picture of an A4 Sheet of lasered slates, and a single strip which has the slate-and-a-half on the left.

I can now cut the four lengths required for one row, and stick them down to the base, prep, glue and repeat. It’s SO much easier not doing this on the actual building, and presuming nothing has changed the size & shape of the base, it’ll fit when I’m done!
There does seem to be a tendency for the slates to curl up a bit, but the rice, pasta etc seems to deal with that.
Osgood
Western Thunderer
It’s “old school” PVA you want to avoid - I had to chuck a whole can out once, it had dehydrated and solidified.………Sticking them down with cheap “school” PVA, seems to work OK.
simond
Western Thunderer
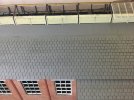
14 rows done. 5 full ones, a half height row and about 12 short rows to go. Currently drying under an eclectic mix of chickpeas, lentils, rice and spaghetti. The spaghetti is ideal, but we only had two packs, and the strands are only about 300mm long.
if it all works, I’ll start on the other side…
if it all works, I’ll start on the other side…
Pencarrow
Western Thunderer
I'm coming a bit late to this, but can I suggest double sided tape for sticking down the slates. It made our life a lot easier (and quicker and less messy) when we discovered this trick for Heyside.
Richard
That's what the York Model Making laser cut slates use - 3M tape on the rear of grey paper. I've used them on multiple buildings and have had no issues with slates lifting over time. As as added longevity I also soak the tiles overhanging gable ends and gutters with thin superglue. Stops them getting bent and bash damage so easily.
simond
Western Thunderer
To my surprise and not a little concern, it’s gone a bit wrinkly…

I thought that it drying out overnight would have been sufficient, but after about 36 hours on the locoshed roof, it’s nowhere near as flat as it was. This is a bit of a blow…
I fear that this will prevent the remaining rows going down nicely, so desperate measures are called for…

keep your fingers crossed…

I thought that it drying out overnight would have been sufficient, but after about 36 hours on the locoshed roof, it’s nowhere near as flat as it was. This is a bit of a blow…
I fear that this will prevent the remaining rows going down nicely, so desperate measures are called for…

keep your fingers crossed…
simond
Western Thunderer
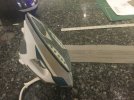
Well, I ironed it, under a tea-towel, and the worst of the wrinkles disappeared, so I got on with it…

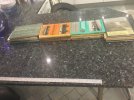
happily, it is sitting pretty flat on the worktop at the moment. I’ll leave it to dry for 24 hours under a lot of books, and hope for the best.
The cut-out to fit around the clerestory vents will need to be trimmed back, and I hope any gaps will disappear under the flashing.
I have not made any effort to cut out the vents, I’m not sure it’s worth the effort, as I doubt I’ll ever fit a smoke generator to the shed. I’ll see when I fit it, and make the stacks.

well, a few books…

happily, it is sitting pretty flat on the worktop at the moment. I’ll leave it to dry for 24 hours under a lot of books, and hope for the best.
The cut-out to fit around the clerestory vents will need to be trimmed back, and I hope any gaps will disappear under the flashing.
I have not made any effort to cut out the vents, I’m not sure it’s worth the effort, as I doubt I’ll ever fit a smoke generator to the shed. I’ll see when I fit it, and make the stacks.

well, a few books…
Last edited:
Tony Overton
Western Thunderer
I can see from your little library you're a firm fan of the Great Western........

Tony Overton
Western Thunderer
I have a similar library, but its 99% Midland Railway.......
I'm watching progress with slating the shed roof with great interest.

I'm watching progress with slating the shed roof with great interest.
Pencarrow
Western Thunderer
Well, I ironed it, under a tea-towel, and the worst of the wrinkles disappeared, so I got on with it…
View attachment 154514
happily, it is sitting pretty flat on the worktop at the moment. I’ll leave it to dry for 24 hours under a lot of books, and hope for the best.
The cut-out to fit around the clerestory vents will need to be trimmed back, and I hope any gaps will disappear under the flashing.
I have not made any effort to cut out the vents, I’m not sure it’s worth the effort, as I doubt I’ll ever fit a smoke generator to the shed. I’ll see when I fit it, and make the stacks.
View attachment 154516
well, a few books…
I can see your next modelling purchase being a Corby Trouser Press...


