You are using an out of date browser. It may not display this or other websites correctly.
You should upgrade or use an alternative browser.
You should upgrade or use an alternative browser.
LarryG
Western Thunderer
Ironing Cavalry Twill trousers made them shiny so I clamped my drainpipes in dads trouser press and placed it under the rug by the fire. Dad walked in while shaving and did an Oliver Hardy somersault over the press. Sorry, but the image still makes me laugh 60 year's later.
Last edited:
simond
Western Thunderer
Well, not quite 24 hours, but I think we can call this a win…
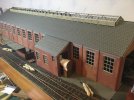
just got to make another one, and do the roof glazing, the smokestacks, and roof flashing.
Rainwater goods, the boiler & chimney, door hinges, roof walkways and ladders.
and the glazing…
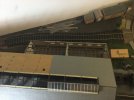
there’s a workshop, offices & stores round the back too, but I don’t think it will get detailed internally…

just got to make another one, and do the roof glazing, the smokestacks, and roof flashing.
Rainwater goods, the boiler & chimney, door hinges, roof walkways and ladders.
and the glazing…

there’s a workshop, offices & stores round the back too, but I don’t think it will get detailed internally…
Last edited:
simond
Western Thunderer
So I put the slate “panel” into place at about 6pm, and took the photos, all good. A few minutes ago, I noticed that it had curled up! It appears that, despite 20-odd hours under a pile of books, it was still drying out and shrinking, and the gap between the parts that reach up to the ridge had shrunk and this was pulling the ends up.
I should have taken a photo, but it’s back on the kitchen worktop under books again.
it appears that I will have to leave it for a considerable period to settle and de-stress itself, before perhaps trimming a mm or so from the edges either side of the clerestory. I guess I can cut this back a bit, as there should be flashing over the slates, so that would hide any gaps.
Worth a thought for anyone else making a roof over a metre long, with a cut-out in the middle…
Given the horrid weather, I might just cut the slates for the other side and try to finish that over the weekend. Then I’ll decide which panel looks better and put that on the viewing side of the building.
simond
Western Thunderer
Took a photo this morning whilst the porridge was irradiated.
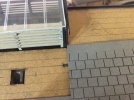
the slate panel is now flat again, happily I caught it before it had deformed permanently, and as you can see, it doesn’t fit the clerestory, again. It’s odd, because it doesn’t seem to have shrunk much in overall length, there’s no obvious gap to the barge boards.
I will leave it flat, on the layout, until tomorrow before checking further & trimming to fit. Begs the question of which glue to use to stick it in place
atb
Simon.
michael mott
Western Thunderer
So what's with those guys lying down on the job?Well, not quite 24 hours, but I think we can call this a win…
View attachment 154542
just got to make another one, and do the roof glazing, the smokestacks, and roof flashing.
Rainwater goods, the boiler & chimney, door hinges, roof walkways and ladders.
and the glazing…
View attachment 154543
there’s a workshop, offices & stores round the back too, but I don’t think it will get detailed internally…
Michael
simond
Western Thunderer
Second side done. Did it in one go, slight change to working practice in applying the glue, was a bit quicker. Took about 3 hours.
Will let this one dry out flat under some of the book collection for 48 hours….
Something to look forward to after all the Monday meetings…
I think the first one will go on the far side of the shed, where the poor fit will be less obvious. The overall length came out probably two mm shorter than expected. It’ll be interesting to see how much this one shrinks, I really don’t feel like making another one.
might have a go at the clerestory glazing tomorrow.
thinking to the next step, what do the congregation feel about gluing the slated panels to the shed roof?
Options in mind are more PVA or permanent spray mount. Comments & other suggestions most welcome!
ta
Simon
Last edited:
simond
Western Thunderer
Second panel made,
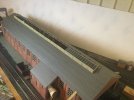
the shrinkage of the first panel is evident at the near end of the far side, I’m going to address that by a bit of microsurgery. Happily, the second (nearer) appears to have remained as originally intended.
I wonder if the shrinkage was caused by the ironing of the first panel to resolve the 3D warping I experienced.
The question remains - what glue to use to fix the panels to the MDF roof?
PVA?
Spray Mount?
something else?
What??
cheers
Simon
Last edited:
Yorkshire Dave
Western Thunderer
I wonder if the shrinkage was caused by the ironing of the first panel to resolve the 3D warping I experienced.
Could well be the case as ironing would have hastened the drying process and removed moisture from the wood. I presume both roof panels were cut from the same sheet of MDF.
I would let the whole ensemble settle for a month or so before attempting microsurgery to let both panels reach an equilibruim with the room's ambient temperature and humidity levels. The shrunk panel may absorb moisture and the later panel may dry further.
In it's current state the last thing you want to do is adjust one panel to match the other only to adjust the other panel later to match the one you had adjusted. Sounds rather like Permanent Secretary or Hitchikers Guide speak.
Sticking the roof to the structure. How about using (at regular intervals) small magnets either embedded in the top of the wall and thin tin stuck or miniature steel screws screwed to the underside of the roof or vice versa - steel screws in the wall and tiny magnets embedded in the roof panel. This will allow the roof panels to be removed without resorting to a blade. If you wanted to use glue, why not a latex glue - again, makes it easier to remove the roof panels if necessary. Guttering would hide any obvious joins.
simond
Western Thunderer
Thanks Dave,
the roof of the building is MDF, well braced and has been in place for several years. I’m pretty confident that it’s stabilised. The slated panels are strips of card slate “combs” stuck to a base layer of the same card with PVA, and whilst I’m hopeful, the jury is still out on how long these need to finally stop “relaxing”. I do agree that letting it all settle for a week or two before committing to glue will not be a bad thing.
The microsurgery I have in mind is to remove the slates from the least visible edge, and add a wide (ie slate-and-a-half) slate in place of standard ones, and two standard ones where the slate-and-a-half are currently. This will gain approximately 3.5mm, and I can then trim off maybe half a mm each side to get it to fit between the bargeboards. I’m hopeful that this can be done pretty much invisibly.
I’m pondering spray mount as the fixative, as it will not soak into the panels or the MDF, thus avoiding further stretching & shrinkage, and I can lay the panels face down on old newspaper to spray them, thus avoiding masking issues. I believe it’s possible to buy permanent versions suitable for “art” rather than “carpet laying”.
thanks again
Simon
Pencarrow
Western Thunderer
Evening Simon, the roof story continues.
Gluing the parts together? Nothing wet as I think that would just restart any warping / shrinkage. So PVA would be out.
I'd also vote for letting it dry off a few more weeks before fixing, it obviously hasn't finished moving yet.
For me, I'd go for the old Evostick contact adhesive. New tin so it's nice and thin.
I'm sure you'll come up with something that works well though.
Pencarrow
Western Thunderer
Thanks Chris,
I think I agree re the PVA,
New tin of contact? Would you use it wet, on one surface, or follow the instructions, apply to both, and let it dry?
the panels are 1m10 x 120mm, a failed alignment is just too hideous to imagine…
ta
Simon
Yes I think I'd go for applying to one surface, and not waiting for it to be tacky before pressing the two parts together. That will give some chance of adjusting the position.
The spray glue you've mentioned would be tricky. The permanent stuff will grab immediately and give you positioning issues. The repositional type, in my experience, won't grab strongly enough to prevent later lifting or warping.
Might be a two person job lifting and positioning the roof - not easy.
simond
Western Thunderer
A bit of light hearted not-terribly-to scale Impressionism this evening…
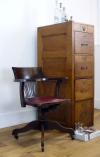
a bit of office furniture lasered from 2mm MDF.
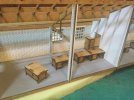
I’ll put card tops on the desks and spray them using some rattle can brown. Need to work out how to laser up some 1930‘s office chairs next. Probably also need a bigger desk for the Coddy. probably ought to put typewriters on the 3D printer list, (along with an aspidistra in a pot) but not yet having such a device would make that rather presumptuous
Also want some fitting benches, bookshelves, a stores “window” and a porch per the original shed. I might knock up a big pillar drill and a lathe as well. I have a few more filing cabinets but I made a cock-up with the laser file so the fronts need re-cutting.
a bit of office furniture lasered from 2mm MDF.

I’ll put card tops on the desks and spray them using some rattle can brown. Need to work out how to laser up some 1930‘s office chairs next. Probably also need a bigger desk for the Coddy. probably ought to put typewriters on the 3D printer list, (along with an aspidistra in a pot) but not yet having such a device would make that rather presumptuous

Also want some fitting benches, bookshelves, a stores “window” and a porch per the original shed. I might knock up a big pillar drill and a lathe as well. I have a few more filing cabinets but I made a cock-up with the laser file so the fronts need re-cutting.
simond
Western Thunderer
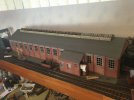
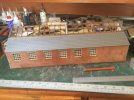
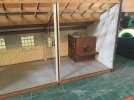
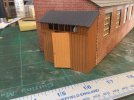
Roof progress…. Along with the office & fitters’ shop, the lobby and the porch.
some bargeboards & rainwater goods now required on the offices, and I want to fit some lights too.
I’m not in the mood today, but I must get the CAD finished for the etches for the hinges and walkways, and then I can fit the smokestacks.
I took Chris’ suggestion of using contact glue “wet” to put the slates on, with the aid of three friends, this was achieved remarkably quickly. I also grafted in an extra slate width down the edge at the back
this is impossible to see from normal angles, but can be photographed…
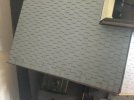
unlike “little Ern” you can see the join, but I’m pretty happy with that. The slight gap on the front edge (to the right) is less satisfactory, but I have a Baldrick-worthy cunning plan.
Conclusion. This approach to making slated roofs works, and I’m very pleased with the overall results, but you have to assume they will shrink, (about one to two millimetres in over a metre) and allow for that in the design. Ideally fit the bargeboards last.
and I fitted desk tops and gave the furniture a blast of rattle can.
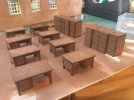
they look much darker in reality than in the photo, certainly good enough for “through the windows” viewing. I’ll decorate a few desks (blotters, typewriters, etc) and laser up some chairs for fun.
Last edited:
michael mott
Western Thunderer
And handles on the file cabinets? A sliver of paper would give the impression perhaps from a gold paper.
Michael
Michael

