simond
Western Thunderer
Back to 3D printing, how’s this?
It’s a 3D printed point actuator, with the lid on its 50mm square by 28.5 high, and as I have wittered on about for some years, the servo is pretty much on TDC / BDC at each end of the stroke, and therefore does not get close to stalling, and does not get back-driven - that, of course might not be ideal if it flings your pride-and-joy into the cess.
It also incorporates a single ZM microswitch with change-over contacts for frog polarity.
I’ve been pondering it for a while and had sketched a few ideas, but basically drew the model yesterday morning, printed it overnight, reprinted the arms this afternoon and put it together whilst the France Poland match was on.
It’s intended for a garden application so the wires come out underneath. I’d expect it to be much better than showerproof, and a blob of silicone grease on the rod and the wires will keep out both water and spiders.
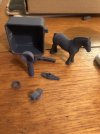
Whilst I was at it I printed a couple of horses and some engine room vent cowls that my puffer has been missing since I built it in 2010 - the wheels don’t grind fast down here! Both were a bit of a disappointment, the cowls were simply too thin (0.3 not good, 0.6 is fine) and the horses were lacking rear legs which seems to be due to insufficient supports under their hairy hooves.
A reprint sorted both problems

This is the cover

And the actuator in both positions


It’s a 3D printed point actuator, with the lid on its 50mm square by 28.5 high, and as I have wittered on about for some years, the servo is pretty much on TDC / BDC at each end of the stroke, and therefore does not get close to stalling, and does not get back-driven - that, of course might not be ideal if it flings your pride-and-joy into the cess.
It also incorporates a single ZM microswitch with change-over contacts for frog polarity.
I’ve been pondering it for a while and had sketched a few ideas, but basically drew the model yesterday morning, printed it overnight, reprinted the arms this afternoon and put it together whilst the France Poland match was on.
It’s intended for a garden application so the wires come out underneath. I’d expect it to be much better than showerproof, and a blob of silicone grease on the rod and the wires will keep out both water and spiders.
Whilst I was at it I printed a couple of horses and some engine room vent cowls that my puffer has been missing since I built it in 2010 - the wheels don’t grind fast down here! Both were a bit of a disappointment, the cowls were simply too thin (0.3 not good, 0.6 is fine) and the horses were lacking rear legs which seems to be due to insufficient supports under their hairy hooves.
A reprint sorted both problems
This is the cover
And the actuator in both positions

)")


")


