7mm The Derby Line - Rolling Stock

dibateg

Western Thunderer
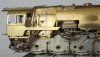
It's all been progressing quite quickly now. The boiler is fitted to the running plate and the cab has been added. BR Standard cabs always seem to be difficult with all those lovely angles, but with constant checking it seems to be the right shape and sitting in the correct plane. Some nice phosphor bronze strip hides the join to the firebox. The exhaust castings have been cleaned up and reasonably fettled - there will be the smoke deflector to add. There should also be a hefty bracket coming out of the frames to support the bottom of the nozzles bit, I don't think that's in the kit, but once I know where the wheels come to I will knock something up.

P1030089.JPG
 

dibateg

Western Thunderer
Too late Jon - thanks anyway..

It always takes an age to add the details, and a gloomy Sunday helps progress. So it would be best to add all the steps and big items before adding the pipework. The big castings at the front took a fair bit of filing. It would be difficult to get an exact fit, but they are pretty close. The feed to the blast nozzles is a little understated, but it would be difficult to change that without scratching up a whole new assembly. The steps butt solder to the boiler, I don't know how long that would last, so the front ones have a sneaky 0.6mm wire underneath soldered into a suitably drilled hole. I'd love to know what that disk arrangement is on the white metal pipe coming from the front of the loco. There is also that gap at the front of the frames where the running plate drops - I've seen it on other of Jim's BR Standards, so a strip of material is added to fill the gap. I've also added ( and can be seen extreme right ) a representation of the buffer beam support from square section brass.
Pipes next, the bit I like...

P1030092.JPG
 

dibateg

Western Thunderer
Thanks JB and a bit more:-

I'm annoyed this morning, having found errors in the kit that are too late to fix. It's only now when piping up that I notice that the handholds on the RH fire box top are opposite those on the LH side They should be further forward. Had I spotted it earlier, perhaps I could have made up a new piece of cladding. Poo. I failed to follow my normal rule to distrust every part!
I couldn't get the supplied deflector to work as it seemed too short in length, so this is the 92023 one modified ( it had a different deflector to the others ). Both are in the kit.
Fans of German class 50s will recognise the step and inset handrail arrangement on the firemans side. I've spotted that the mid cab support outrigger is missing, so I will add that, to provide a little more support to that German step and fill in that empty gap.

P1030093.JPG
 

dibateg

Western Thunderer
The body is now finished to all intents and I am on with the chassis. I never like doing sand pipes, they are always a fiddle - steam pipes are yet to be added in this pic. The sand boxes are soldered directly to the frames with Griffin sand traps. you can also see the LH exhaust steam pipe ( made from 4mm or so dia copper wire ) with it's flange passing over the pre heater - there was nothing in the kit for this. The brakes are from the kit and not quite right, but will do the job. Cylinder covers and glands are Ragstone. The red hubs are to indicate LH wheels, once I have fitted them, they always stay in the same orientation - but they've been on and off that many times...

P1030102.JPG
 

dibateg

Western Thunderer
I'm now getting to know my way around 9F injectors, this being my 4th set this year although it took me several attempts to get the support bracket in the right position. Studying the photos I noticed something different with the original Crosties, in that there is a casting bolted on to the outlet of the live steam injector that provides two outlets - which makes sense as there are three clacks. No provision is made in the kit for this so I scratched one up from some brass sprue, odds and ends and some left over square unions from the DJH project. There is also and extra support bracket, again scratched up. I keep thinking I'm on the home straight, I must be now...
P1030105.JPG

One of the bits missing from the kit is the distinctive bracket off the frames that supports the side chimney. It's not 100% accurate, as it has to fit in with the castings in the kit, but I made up the pair and soldered them to slots cut in the frames. It looked a little empty there otherwise
P1030106.JPG
 

Attachments

  • P1030105.JPG
    P1030105.JPG
    235.9 KB · Views: 12

dibateg

Western Thunderer
It's been one step forward and two back. Everything is painted now, and whilst that's been going on I've been working on the valve gear. Only to discover that the weighshaft bearings don't line up and the return crank pivot is 3mm too far forward. I'm not sure if it's my mistake, but I should have checked rather than assumed.. So some rework is taking place on the left hand motion bracket. I also broke off one of the exhaust support brackets ( insert suitable swear word here ) and had to make a new one. It's all completed now, and the valve gear is all working, but here is work in progress.
P1030107.JPG
 

dibateg

Western Thunderer
Whilst I've been waiting for the last few bits for the Crostie ( which actually came very quickly this morning ) I though I'd get on with some DCC conversions, starting with putting MX696's in my Heljan 20s. Rather than have floating connections, I thought I'd utilise the Heljan pcb to distribute the connections taking advantage of the screw terminals. The 696 has ribbon cable to connect to the outside world, that is easy enough to strip apart the wires to connect them. I had to hacksaw a chunk off the central chassis tower to allow the decoder to sit under the Heljan pcb. I also managed to reconnect the lights and get them working. I've got the fan connected to F1, but not sussed out how to config that yet.
My NCE Procab couldn't read the MX696 on the program track, so I had to dig out the Sprog 2 to config the cvs and loco number from the computer.

So that's the 20s done, next up ( in the background ) is a rather nice scratchbuilt Battle of Britain class.

This is the birds nest, it just about fits back inside the loco body:-
P1030116.JPG
 

Pugsley

Western Thunderer
I'd also recommend taking a look at the CV # 61 = 98 method of function allocation, I used this for the lighting on my 37 and it worked quite well, it wasn't too hard to set up either.
 

dibateg

Western Thunderer
Thanks Pugsley.
Weathering of the Crostie is in progress, it takes me days..
IMG_20151030_145635871.jpg

Meanwhile 90115 is under repair - new slidebars to replace the original Oakville whitemetal ones. My Oakville WD still has them and because the running plate is soldered to the frames, the cylinders are impossible to remove... and interesting challenge.

P1030126.JPG
 

Attachments

  • P1030119.JPG
    P1030119.JPG
    167.2 KB · Views: 9

parky

Western Thunderer
hmm that has put me in a quandary :(

I have a reservation on the revered MOK 9f, but if the Seven kits can be built to look that good then I could have two :drool:
 

Dikitriki

Flying Squad
hmm that has put me in a quandary :(

I have a reservation on the revered MOK 9f, but if the Seven kits can be built to look that good then I could have two :drool:

No, you couldn't! There's a shed load of Ragstone components gone into the Crosti - most of the Seven model castings hit the bin. :)

Richard
 
Last edited:
Top