7mm The Derby Line - Rolling Stock

dibateg

Western Thunderer
Ha! I think you are right Ian!

On with the frames, I couldn't find any spacers in the kit, so made some up from spare ones ( mostly JLTRT GWR County! ) from the etch bin. the kit frames are designed to have an inset section for the rear wheels, but the drawing implies that the frames taper by 3 inches, and remain narrow to the rear buffer beam. So modifications as seen below, with the rear section becoming a sub frame.
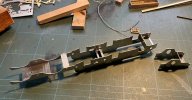
IMG_1278.JPG

So... lining everything up to make sure it is all straight and we'll be ready to put the hornblocks in next... This is supposed to be a simple chassis!
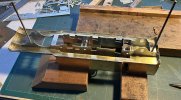
IMG_1279.JPG

I'll still chase up the missing frame spacers....
 

Dave Holt

Western Thunderer
Tony,
I'm sure you're right about the rear end of the frames, an arrangement that seems quite common. Your solution is very neat.
My C13 has the same feature (and also at the front end, with the very front tapering in as well) although, in my case, the frames were designed so they remain in one piece and are the correct length after joggling.
All looking good.
Dave.
 

dibateg

Western Thunderer
I'm battling my way through this thing... The floor in the kit was vague and the etches don't seem to relate to the instructions, so some is adapted, the rest scratch built. The main floor has to sit on top of the mainframes and then everything above that is made to fit. What I couldn't get from the drawing was estimated or copied from the 4mm Sonic model.
IMG_1332.JPG

The upper cab panels actually fitted without any modification, apart from the cut out in the rear spectacle plate, which was represented by a half etch line. It was the wrong height in any case. So I reversed the panel and cut the hole out. The cab roof is supplied in 0.45 thick brass, which is impossibly thick to form the arc correctly. A replacement was made from 0.3mm sheet.
IMG_1336.JPG
 

timbowales

Western Thunderer
This really is a labour of love, or a triumph of strife over adversity!
You aren't/weren't in the RAF by any chance, their motto is so apt for this.
 

dibateg

Western Thunderer
63859 is nearly complete, it just needs a track test. Then it can be weathered and the front buffers set. The first loco kit I built when I was 13 was the K's ROD, it had the same number.. I'm still not sure what colour to do the inside of the cab. There are some odd lighting marks - I had to use an extra light as it's another twilight day in Wales..
IMG_7506.JPG
IMG_7508.JPG
 

Dave Holt

Western Thunderer
Yes, cab interiors are always a bit of a dilemma. The official BR scheme was black below the windows (which you haven't got) and red oxide above. These applied to the sides and cab front. The boiler backhead was black, the cab roof forward of the stiffening strip was white and black behind the stiffener. Obviously the white didn't stay that way for long.
Whether any works actually followed the official scheme I have no idea. I think most modellers think the upper sides were a sort of cream colour.
On the backhead, gunmetal valves and fittings soon lose their brown colour and turn a lightish grey due to the steam temperature.
Looking rather wonderful
Dave.
 

3 LINK

Western Thunderer
Hi Tony,

A nice looking loco, I do like a 2-8-0. Can I ask what paint and primer you used on this loco.

ATB,

Martyn.
 

dibateg

Western Thunderer
Thanks Dave - I will do something there!

Martyn -
Primer I think was ( professional painters look away now ) Halfords grey etched primer, with a top coat of Halfords satin black. The loco will be pretty grubby in any case, but it does look nice fresh from the works. Had it required lining out - I'd of sent it to one of the pro's..

Once it's passed a test run, I'll weather it down.

Regards
Tony
 

3 LINK

Western Thunderer
Martyn -
Primer I think was ( professional painters look away now ) Halfords grey etched primer, with a top coat of Halfords satin black. The loco will be pretty grubby in any case, but it does look nice fresh from the works. Had it required lining out - I'd of sent it to one of the pro's..

Once it's passed a test run, I'll weather it down.

Regards
Tony
Hi Tony,

Great minds think alike, yes I still used the same colour rattle cans with a black loco.

I am just embarking on a 2884 from Scorpio, but with a few mods, like I will not be using their ( rocking ) side frame method, but will be cutting the frames out and using some of the Slaters brass horn guides and blocks. That should keep me busy for an hour or two..

Regards,
Martyn.
 

dibateg

Western Thunderer
It looks like an ROD backhead will fit nicely....
IMG_1341.JPG

Spot the deliberate mistake..... I don't think any Robinson engines had a round top boiler! The kit boiler has gone in the scrap bin...
IMG_1342.JPG

Fortunately, I had some spare firebox formers, though the J11 firebox is too short.
IMG_1344.JPG

So after some scratch building..
IMG_1346.JPG

I scratched up some former disks, but how to get one in the 2nd end of the boiler? Make it slightly over long and set the disk in hald a mill or so. It can be filed back once the motor cut out is made in the other end and it's been soldered from the inside...
IMG_1347.JPG
 

Dave Holt

Western Thunderer
That firebox error is a bit fundamental. Doesn't auger well for the rest of the kit although your solution looks very good.
Good luck with it.
Dave.
 

dibateg

Western Thunderer
Thanks Dave - most of it is wrong....

It looks like the O4 that the smokebox fitted in LNER/BR days had a rolled edge front plate, this replace the sharp edge GCR one. The one in the kit was too small to give the right appearance, so I made a new one. It is a distinctive llok to the 'face' of the engine. There was no wrapper in the kit, so I rivetted one up from 0.3mm sheet, and rolled it. The boiler and firebox have been aligned and soldered together... hopefully it will be easy sailing form here, although the front frame extensions will need some work...
IMG_1360.JPG
 

LarryG

Western Thunderer
I have a vague memory of a cab interior (L&Y 0-6-0) of being a sort of burned creamy-mustard with brown in the corners. I doubt the paint could be recovered without sandpaper. Probably best to apply a weak wash of creamy-mustard to suggest something not-black is there. I have no idea how the Eastern Region painted its cab interiors.
 
Top